Oracle Database 12c upgrade from 11.2.0.2 is supported

Obtaining the Software 12.1.0.2.0 from the patchset 21419221 "Patchset 21419221
Once Download done, check the following:-
Verify that the files you downloaded are the same size as the corresponding files on Oracle Technology Network.
Also verify the checksums are the same as noted on Oracle Technology Network using a command similar to the following:
cksum filename.zip"
Direct upgrade from 11.2.0.2 is supported
Oracle E-business suite 11.5.10 CU2 patches " Patch 3460000 - 11.5.10 E-Business Suite Consolidated Update 2- Applied
Patch 10350522 - Prerequisite patch for 16289505- Not Applied
Patch 12539637 - Prerequisite patch for 16289505- Not Applied
Patch 20621314 - Prerequisite patch for 16289505- Not Applied
Patch 9535311 - TXK AUTOCONFIG AND TEMPLATES ROLLUP PATCH U - Already Applied
Patch 16289505 - 12c Release 1 interoperability patch for 11.5.10 - Not Applied ( Requires 11i TXK RUP-U,9535311 which is already applied)"
ATG Rollup Patch 7 (Application Tier) Apply Patch 6241631- Applied
Developer 6i (Patch set 19) Already in Patchset 19

Creating 12.1.0 Oracle Home Make Directories for new 12c Oracle RDBMS Home
Install 12c RDBMS Software Stage the software before upgrade
Install 12c Examples CD "Once the Installation is done, make sure you source the 12c Oracle Home.
The ORACLE_HOME environment variable points to the new 12.1.0 Oracle home.
The PATH environment variable includes $ORACLE_HOME/bin and the directory where the new perl executable is located (usually $ORACLE_HOME/perl/bin).
The LD_LIBRARY_PATH environment variable includes $ORACLE_HOME/lib.
The PERL5LIB environment variable points to the directories where the new perl libraries are located (usually $ORACLE_HOME/perl/lib/[perl version]
and $ORACLE_HOME/perl/lib/site_perl/[perl version])"
Create /nls/data/9idata directory
Apply additional 12.1.0.2 RDBMS patches "Patch 19393542- Pre-req of EBS CPU Patch
Patch 19627012
Patch 20204035
Patch 20903906 "
Database Upgrade Steps:-
Shut down Applications server processes and database listener
Drop SYS.ENABLED$INDEXES (conditional) "If the SYS.ENABLED$INDEXES table exists, use SQL*Plus to connect to the database as SYSDBA and running the following command to drop it:
SQL> drop table sys.enabled$indexes;"
"Verify the JRE version in Oracle Home
To upgrade to 12cR1 minimum version of JRE required is version 6. Please make sure that Installed version of JRE in an existing Oracle Home.
If the Installed version is lower than required then please upgrade it." "/ora/bovprod/home/product/11.2.0/jdk1.7.0_79
/ora/prodx/home/product/11202/jdk1.7.0_79"
Remove the MGDSYS schema "If upgrading from database version prior to 12c than drop MGDSYS schema from the existing database. Execute script ""catnomgdidcode.sql ""
from an existing Oracle home.
"
Run pre upgrade tool "Pre Upgrade tool will lists all changes need to be performed before starting the upgrade process.
Copy pre upgrade scripts from 12cR1Oracle home to any other directory.
"
Check for INVALID database components and objects in the Source database "set pagesize500
set linesize 100
select substr(comp_name,1,40) comp_name, status, substr(version,1,10) version from dba_registry order by comp_name;
select substr(object_name,1,40) object_name,substr(owner,1,15) owner,object_type from dba_objects where status='INVALID' order by owner,object_type;
select owner,object_type,count(*) from dba_objects where status='INVALID' group by owner,object_type order by owner,object_type ;" "$ cd $ORACLE_HOME/rdbms/admin
$ sqlplus ""/ as sysdba""
SQL> @utlrp.sql"
Scripts to automatically update the RDBMS DST (timezone) version in an 11gR2 or 12cR1 database . (Doc ID 1585343.1)
Optimizer Statistics "$ sqlplus ""/as sysdba""
sql> EXEC DBMS_STATS.GATHER_DICTIONARY_STATS" Note 560336.1 Script to Check Schemas with Stale Statistics
Perform Full Database backup
Upgrade Database
Upgrade Database Use DBUA for upgrading database
Post Upgrade Steps
Install patch post Installation steps for all RDBMS patches (opatches) "Perform post Installation steps for all Installed patches prior to upgrade.
If DATAPATCH is required to run then it can be run but only once.
"
Start Listener from 12cR1 Home "Start the new database listener (conditional)
If the Oracle Net listener for the database instance in the new Oracle home has not been started, you must start it now.
Since AutoConfig has not yet been implemented, start the listener with the lsnrctl executable (UNIX/Linux)
"
Run adgrants.sql "Copy $APPL_TOP/admin/adgrants.sql (adgrants_nt.sql for Windows)
from the administration server node to the database server node. Use SQL*Plus to connect to the database as SYSDBA and run the script using the following command:
$ sqlplus ""/ as sysdba"" @adgrants.sql"
Grant create procedure privilege on CTXSYS "Copy $AD_TOP/patch/115/sql/adctxprv.sql from the administration server node to the database server node.
Use SQL*Plus to connect to the database as APPS and run the script using the following command:
$ sqlplus apps/[APPS password] @adctxprv.sql \
[SYSTEM password] CTXSYS
"
Set CTXSYS parameter "Use SQL*Plus to connect to the database as SYSDBA and run the following command:
$ sqlplus ""/ as sysdba""
SQL> exec ctxsys.ctx_adm.set_parameter('file_access_role', 'public');"
Gather statistics for SYS schema Copy $APPL_TOP/admin/adstats.sql from the administration server node to the database server node.
Note that adstats.sql has to be run in restricted mode. Use SQL*Plus to connect to the database as SYSDBA and
use the following commands to restart the database in restricted mode, run adstats.sql, and restart the database in normal mode:
$ sqlplus "/ as sysdba"
SQL> alter system enable restricted session;
SQL> @adstats.sql
$ sqlplus "/ as sysdba"
SQL> alter system disable restricted session;
SQL> exit;
Deregister the current database server (conditional)
"If you plan to change the database port, host, SID, or database name parameter on the database server,
you must also update AutoConfig on the database tier and deregister the current database server node.
Use SQL*Plus to connect to the database as APPS and run the following command:
$ sqlplus apps/[APPS password]
SQL> exec fnd_conc_clone.setup_clean;
"
Implement and run AutoConfig
Re-create OPATCH_INST_DIR directory "Use SQL*Plus to connect to the database as SYSDBA and run the following command to re-create the OPATCH_INST_DIR directory:
SQL> create or replace directory OPATCH_INST_DIR as '[ORACLE_HOME]/OPatch';
"
Re-create custom database links (conditional)
Re-create grants and synonyms
Run AutoConfig on Application Tier
Restart Applications server processes (conditional)
Database PSU Patching Oct CPU 2015 Check the Doc mailed by Sudipta
Reference
Interoperability Notes EBS 11i with RDBMS 12cR1 (Doc ID 1524399.1)
Complete Checklist for Upgrading to Oracle Database 12c Release 1 using DBUA (Doc ID 1516557.1)
Scripts to automatically update the RDBMS DST (timezone) version in an 11gR2 or 12cR1 database (Doc ID 1585343.1)
Weblogic Managed server status struck.
We faced the issue while starting the weblogic managed server, the status of the server struck in STARTING.We could not able to find a valid error messages in the log files
Managed Server Log File:
<30-Oct-2014 11:13:29 o’clock GMT> <Notice> <WebLogicServer> <BEA-000365> <Server state changed to STARTING>
No logs are getting printed after this.
Node Manager Log File:
<30-Oct-2014 11:09:44> <INFO> <SOACoreDomain> <MS1> <Server failed during startup so will not be restarted>
<30-Oct-2014 11:09:44> <WARNING> <Exception while starting server ‘MS1’>
java.io.IOException: Server failed to start up. See server output log for more details.
at weblogic.nodemanager.server.AbstractServerManager.start(AbstractServerManager.java:200)
at weblogic.nodemanager.server.ServerManager.start(ServerManager.java:23)
at weblogic.nodemanager.server.Handler.handleStart(Handler.java:604)
at weblogic.nodemanager.server.Handler.handleCommand(Handler.java:121)
at weblogic.nodemanager.server.Handler.run(Handler.java:71)
at java.lang.Thread.run(Thread.java:662)
The root cause of this issue is somehow the ldap directory of the server got corrupted.
To resolve this issue:
Kill the managed server
Remove the ldap folder from the following location <<DOMAIN_HOME>>/servers/<<Managed Server>>, this file will be auto generated while restarting the server.
Restart the server
APEX Workspace Image directory is not set up properly
Apex
,
AppsDBA
,
Oracle DBA
,
R12.2
No comments
:
Step 1:[apapex@ATGAPPS apex_listener]$ java -jar ords.war setup
Jan 15, 2016 12:30:11 PM oracle.dbtools.common.config.file.ConfigurationFolder logConfigFolder
INFO: Using configuration folder: /tmp/ords
Enter the name of the database server [localhost]:atgapps
Enter the database listen port [1521]:
Enter 1 to specify the database service name, or 2 to specify the database SID [1]:2
Enter the database SID [xe]:
Enter the database user name [APEX_PUBLIC_USER]:
Enter the database password for APEX_PUBLIC_USER: <Password is kb321456>
Confirm password:
Enter 1 to enter passwords for the RESTful Services database users (APEX_LISTENER,APEX_REST_PUBLIC_USER), 2 to use the same password as used for APEX_PUBLIC_USER or, 3 to skip this step [1]:2
Jan 15, 2016 12:30:41 PM oracle.dbtools.common.config.file.ConfigurationFiles update
INFO: Updated configurations: defaults, apex, apex_al, apex_rt
[apapex@ATGAPPS apex_listener]$ pwd
/u01/app/middleware/apex_listener
[apapex@ATGAPPS apex_listener]$
Step 2:
[apapex@ATGAPPS apex_listener]$ java -jar ords.war static /u01/app/middleware/apex/images
WAR Generation complete
WAR location : /u01/app/middleware/apex_listener/i.war
Context path : /i
Static resources : /u01/app/middleware/apex/images
Ensure the static resources are available at path: /u01/app/middleware/apex/images
on the server where the WAR is deployed[apapex@ATGAPPS apex_listener]$
[apapex@ATGAPPS apex_listener]$
Step 3: Restart weblogic admin server
Oracle Applications Release R12.2 Printer Registration
Printer Registration, CUPS, Pasta Configuration, PDFPrinting Oracle Applications R11/R12/R12.2
Brother – Network printer – Phote Printer, scanner, fax, copier, – All in one
MFC-295CN
IP – 192.168.1.5
Dell Server
8 port hub – One end of Ethernet cable goes to printer and other end goes to Hub, it automatically assigns a IP address
High Level Steps
- Download CUPS software
- Download the driver for your printer
- Add the printer - Brother_MFC-295CN
- Modify pasta_pdf.cfg for PDF Printing
- Register the printer with Oracle Applications
Printer IP Address – 192.168.1.5
In companies, first 3 activities will be done by System Administrators – No worries, lpstat –a – to know all the printers registered from Linix/Unix
hp501 accepting requests since Mon Jun 04 11:08:17 2007
hp9k01 accepting requests since Mon Jun 04 11:38:14 2007
hkhp410001 accepting requests since Mon Jun 04 11:38:54 2007 hkhp410003 accepting requests since Mon Jun 04 11:39:35 2007 hkhp510001 accepting requests since Mon Jun 04 11:42:16 2007 hkhp510002 accepting requests since Mon Jun 04 11:42:50 2007 hp405001 accepting requests since Mon Jun 04 11:43:22 2007 hp9k07 accepting requests since Mon Jun 04 11:49:56 2007
Download CUPS software
Navigate to http://www.cups.org, click on Download next to the latest version, then choose the .tar.gz or .tgz file and save it on your computer. Once installed we perform the following steps (please note that you might have to change the version numbers if you downloaded a newer version).
Steps (see „Description" for definition):
1. tar xvjf cups-1.4.6-source.tar.bz2
2. cd cups-1.4.6
3. ./configure
4. make
5. make install (you need to be root to install the binaries)
6. /etc/init.d/cups start
Download the driver for your printer
http://welcome.solutions.brother.com/bsc/public_s/id/linux/en/index.html
Click Printer Driver
Select MFC-295CN
mfc295cnlpr-1.1.2-1.i386.rpm mfc295cncupswrapper-1.1.2-2.i386.rpm rpm –Uvh mfc295cnlpr-1.1.2-1.i386.rpm
rpm –Uvh mfc295cncupswrapper-1.1.2-2.i386.rpm
Click MFC295NC
Click Administration – Modify printer
Click Maintenance – Print Test Page
Check printers.conf in /etc/cups
http://welcome.solutions.brother.com/bsc/public_s/id/linux/en/instruction_prn1c.html#ppd1
[root@linux1 cups]# lpstat -a
Brother_MFC-295CN accepting requests since Thu 24 Jun 2010 06:52:15 PM IST
Test the printer
lp <filename>
Modify pasta_pdf.cfg for PDF Printing
cd $FND_TOP/resource
vi pasta.pdf.cfg - confirm the below.
% Preprocess for PDF output
% This is an example for PDF output to print.
; Xpdf
preprocess=pdftops {infile} {outfile}
; Ghost Script
; preprocess=pdf2ps {infile} {outfile}
; Acrobat
; preprocess=acroread -toPostScript -pairs {infile} {outfile}
For landscape printing only
cp pasta_pdf.cfg pasta_pdf_land.cfg vi pasta_pdf_land.cfg
Modify the below line
printCommand=lp -c -o landscape -d{printername} Restart the concurrent processing server after the changes
Register the printer with Oracle Applications
Login with System Administrator Responsibility
Check printing – Change Style – PDF Publisher
Navigation: System Administrator - Install – Printer
If printer is known printer (HP), select type accordingly else select PASTA Universal Printer
We need to Register the Printer with the same name which has been derived at the Linux BOX
level, and define the Type as Brother_MFC-295CN
Navigation: System Administrator - Install - Printer – Driver
In this we will be having four options where we can define a Custom Printer as well as Custom
Printer Drivers for Printer.
We need to register a Printer in the following Steps: Driver -> Styles -> Types -> Register
In order to make use of PDF Printing Directly from a Concurrent Program we need to have
PASTA_PDF Driver existing in the Oracle Applications. Navigation: System Administrator -> Install -> Printer -> Driver Driver Name : PASTA_PDF
User Driver : Pasta PDF Driver
Description : Pasta driver to print pdf converted to PostScript by 3rd party utility
Driver Method : Program
Driver Method Parameters : Spool File
Program Name : FNDPSTAX
Arguments: -pn$PROFILES$.PRINTER -f$PROFILES$.FILENAME – c$PROFILES$.CONC_COPIES - Fpasta_pdf.cfg
We need to check whether a PDF Publisher Styles exists or not. Navigation: System Administrator ->Install -> Printer -> Style
Check that for the type PASTA Universal Printer Type - PDF Publisher and PASTA_PDF are present.
Defining and Assigning the Printer at Concurrent Program Level
Let us consider the Example of Defining a printer for Concurrent Program.
Usually we define Portrait or Landscape for the Style in the Concurrent Program at Output Tab. Here we need to specific PDF Publisher as the Style in Concurrent Program and as well we have
to mention the Name of the Printer which was registered in the Oracle Applications.
Run this program to get the output at Printer Tray
Select Options to select printer name and give number of copies as 1
Bounce the Concurrent Managers in case things didn’t work
References: http://www.netikus.net/documents/Linux-Printing-Cups.pdf
http://www.appsassociates.com/resources/bi-resources/PDF_Printing.pdf
Printing junk characters or getting the below error
Problem ->
Request ID 62347 completed warning and below is the log message, but when we use reprint option it printed properly
Printing output file.
Request ID : 62347
Number of copies : 1
Printer : test
Error: May not be a PDF file (continuing anyway)
Error (0): PDF file is damaged - attempting to reconstruct xref table... Error: Couldn't find trailer dictionary
Error: Couldn't read xref table
Pasta: Error: Preprocess failed. Command=pdftops
/d01/oracle/linux1/inst/apps/linux1/appltmp/pasta2433_0.tmp
/d01/oracle/linux1/inst/apps/linux1/appltmp/pasta2433_1.tmp
Pasta: Error: Preprocess or Print command failed!!!
APP-FND-00500: AFPPRN received a return code of failure from routine FDUPRN. Program exited with status 1
Cause: AFPPRN received a return code of failure from the OSD routine FDUPRN. Program exited with status 1.
Action: Review your concurrent request log file for more detailed information.
Solution check
$FND_TOP/resource pasta_pdf.cfg
preprocess=pdftops {infile} {outfile}
Also, Cause
Report" is defaulting to the RTF output format instead of PDF format. The BI Publisher Template
"Default Output Type" is incorrectly set to the RTF format. Solution
1. Verify / set the "Default Output Type" to PDF as follows:
a) Responsibility = XML Publisher Administrator b) Navigate --> Home: Templates
c) Query the Template Code
d) Click on the template name
e) If the "Default Output Type" on the right side of the screen is not set to "PDF", click on the "Update" and set the "Default Output Type" to PDF and save the change.
2. Retest submitting and printing the report with the "PDF Publisher" print style.
In BI-Publisher the output format should be pdf instead of rtf, and output format should be XML
R12.2 Adop Phase=cutover Exiting With Status = 1 (Fail)
ADOP
,
AppsDBA
,
Oracle DBA
,
R12.2
No comments
:
Applying a patch and getting the following : error occurred after execute 'adop phase=cutover'with known that the application is working fine after starting it
[test@uat ~]$ adop phase=cutover
NMProcess: INFO: Saving node manager configuration properties to '/u01/oracle/TEST/fs2/FMW_Home/wlserver_10.3/common/nodemanager/nmHome1/nodemanager.properties'
[UNEXPECTED]Error occurred while executing
[UNEXPECTED]Error executing adadminsrvctl
[UNEXPECTED]Error while trying to start Admin Server
[UNEXPECTED]Cutover phase completed with errors/warnings. Please check logfiles
Log file: /u01/oracle/TEST/fs_ne/EBSapps/log/adop/8/adop_20140318_043032.log
adop exiting with status = 1 (Fail)
You have new mail in /var/spool/mail/test
[test@uat ~]$
Found In Database Alert Log File When Cutover Phase Fails
Solution
You may check if running the # adop phase=cutover again exposes the problem again.
In some cases it's caused by a slow start-up of the services causing a time-out and running the command again completes successfully
Release 12.2 ORA-01578: ORACLE data block corrupted
ERRORThe database alert log shows :
ORA-01578: ORACLE data block corrupted (file # xxx, block # xxxxxx)
ORA-01110: data file xxx: '/datafile/apps_ts_tx_data*.dbf'
ORA-26040: Data block was loaded using the NOLOGGING option
The related database trace files shows :
dbkedDefDump(): Starting incident default dumps (flags=0x2, level=3, mask=0x0)
----- Current SQL Statement for this session (sql_id=xxx) -----
UPDATE FND_OAM_CONTEXT_FILES SET PATH = :B1 , LAST_SYNCHRONIZED = SYSDATE, TEXT = :B4 , LAST_UPDATE_DATE = SYSDATE, LAST_UPDATED_BY = FND_GLOBAL.USER_ID, LAST_UPDATE_LOGIN = FND_GLOBAL.LOGIN_ID, NODE_NAME = :B2 , VERSION = :B3 , STATUS = 'S' WHERE (NODE_NAME = :B2 AND PATH = :B1 AND NAME NOT IN ('METADATA', 'TEMPLATE') AND (STATUS IS NULL OR UPPER(STATUS) IN ('S','F'))) OR (PATH = :B1 AND NAME IN ( 'METADATA', 'TEMPLATE'))
Block corruption after database recovery in table FND_OAM_CONTEXT_FILES due to nologging operations,
that reported the error ORA-01578: ORACLE data block corrupted (file # xxx, block # xxxxxx) in the alert.log file.
Solution:
1. sqlplus apps
SQL> EXEC FND_CONC_CLONE.SETUP_CLEAN;
SQL> COMMIT;
SQL> EXIT;
2. Run AutoConfig on all tiers, first on the DB tiers and then on the APPS tiers, to repopulate the required system tables.
R12.2 Adding an external node on the Applications tier from adcfgclone.pl fails with error
ADOP
,
AppsDBA
,
Oracle DBA
,
R12.2
No comments
:
Adding External Node via perl adcfgclone.pl appsTier Error: Perl lib version (5.10.1) doesn't match executable version (v5.10.0) (Doc ID 1622873.1)Patch FS cloning ends in below error:
perl <ORACLE_BASE>/fs1/EBSapps/comn/clone/bin/adaddnode.pl -appsuser=APPS -promptmsg=hide
Perl lib version (5.10.1) doesn't match executable version (v5.10.0) at /usr/lib64/perl5/Config.pm line 50.
Compilation failed in require at <ORACLE_BASE>/fs1/EBSapps/comn/clone/bin/adaddnode.pl line 25.
BEGIN failed--compilation aborted at <ORACLE_BASE>/fs1/EBSapps/comn/clone/bin/adaddnode.pl line 25.
Whole add node operation is completed, only setting of APPL_TOP_ID has failed.
Please check the error log in <ORACLE_BASE>/fs1/EBSapps/comn/clone/bin and try to run it manually
Looking for incomplete CLONE record in ad_adop_session_patches table
The CLONE record status is no rows selected
Updating incomplete CLONE record to COMPLETED
Sol
1. Downgrade the system perl to v5.10.0.
2. Make sure the variables PERL5LIB and ADPERLPRG are set to the 5.10.0 version.
3. Execute the adcfgclone.pl appsTier again.
OR:
a. Use the perl delivered with rapidwiz located in: <RUN_BASE>/FMW_Home/webtier/perl/
b. Make sure the variables PERL5LIB and ADPERLPRG are set to the 5.10.0 and the system Perl is removed from the PATH.
c. Execute the adcfgclone.pl appsTier again.
R12.2 ORA-04063: rule set APPLSYS.WF_DEFERRED_R has errors
ADOP
,
AppsDBA
,
Oracle DBA
,
R12.2
No comments
:
adcvmlog.xml renamed to /oaph/oracle/oaphappl/fs1/inst/apps/OAPH_oacmph/admin/log/08051619/adcvmlog.xml.08051627WARNING: [AutoConfig Error Report]
The following report lists errors AutoConfig encountered during each
phase of its execution. Errors are grouped by directory and phase.
The report format is:
<filename> <phase> <return code where appropriate>
[PROFILE PHASE]
AutoConfig could not successfully execute the following scripts:
Directory: /oaph/oracle/oaphappl/fs1/FMW_Home/webtier/perl/bin/perl -I /oaph/oracle/oaphappl/fs1/FMW_Home/webtier/perl/lib/5.10.0 -I /oaph/oracle/oaphappl/fs1/FMW_Home/webtier/perl/lib/site_perl/5.10.0 -I /oaph/oracle/oaphappl/fs1/EBSapps/appl/au/12.0.0/perl -I /oaph/oracle/oaphappl/fs1/FMW_Home/webtier/ohs/mod_perl/lib/site_perl/5.10.0/x86_64-linux-thread-multi /oaph/oracle/oaphappl/fs1/inst/apps/OAPH_oacmph/admin/scripts/adexecsql.pl sqlfile=/oaph/oracle/oaphappl/fs1/inst/apps/OAPH_oacmph/admin/install
txkappsprf.sql INSTE8_PRF 1
AutoConfig is exiting with status 1
AutoConfig execution completed on Tue Aug 5 16:27:42 2014
Time taken for AutoConfig execution to complete : 7 mins 56 secs
ORA-04063: Rule Set "Applsys.Wf_deferred_r" Has Errors
Sol 1:
1. Add the missing subscriber back:
sqlplus applsys/<pwd>
declare
lagent sys.aq$_agent;
subscriber_exist exception;
pragma EXCEPTION_INIT(subscriber_exist, -24034);
begin
lagent := sys.aq$_agent('WF_DEFERRED',null,0);
dbms_aqadm.add_subscriber(queue_name =>'APPLSYS.WF_DEFERRED',subscriber=>
lagent,rule=>'1=1');
exception
when subscriber_exist then
-- just add the rule if subscriber exists
dbms_aqadm.alter_subscriber(queue_name =>'APPLSYS.WF_DEFERRED',subscriber=>
lagent,rule=>'1=1');
end;
/
2. Run the concurrent program "GLOOAP module: Open Period" to confirm periods are defined in the proper calendar.
(This step is required only when the request failed with the ORA-04063 error as reported.)
Sol 2:
SELECT DISTINCT substr(object_name, 1, length(object_name)-2) q_name
FROM dba_objects
WHERE object_type = 'RULE SET'
AND object_name like 'WF%'
AND owner in ('APPLSYS', 'APPS')
AND status = 'INVALID';
still returns
WF_JAVA_ERROR
WF_JAVA_DEFERRED
WF_WS_JMS_OUT
WF_WS_SAMPLE
WF_WS_JMS_IN
WF_JMS_OUT
WF_JMS_JMS_OUT
WF_JMS_IN
Type: ODM Question
How to recreate 'APPLSYS.WF_JAVA_DEFERRED_R' subscriber?
Type: ODM Answer
1. Ensure that you have taken a backup of your system before applying the recommended solution.
2. Run the following scripts in a TEST environment first:
Login as apps user and execute the below two scripts
declare
l_wf_schema varchar2(200);
lagent sys.aq$_agent;
l_new_queue varchar2(30);
begin
l_wf_schema := wf_core.translate('WF_SCHEMA');
l_new_queue := l_wf_schema||'.WF_JAVA_DEFERRED';
lagent := sys.aq$_agent('WF_JAVA_DEFERRED',null,0);
dbms_aqadm.remove_subscriber(queue_name=>l_new_queue, subscriber=>lagent);
end;
/
commit;
declare
l_wf_schema varchar2(200);
lagent sys.aq$_agent;
l_new_queue varchar2(30);
begin
l_wf_schema := wf_core.translate('WF_SCHEMA');
l_new_queue := l_wf_schema||'.WF_JAVA_DEFERRED';
lagent := sys.aq$_agent('WF_JAVA_DEFERRED',null,0);
dbms_aqadm.add_subscriber(queue_name=>l_new_queue, subscriber=>lagent,rule=>'1=1');
end;
/
commit;
3. Once the scripts complete, confirm that the OBJECT is VALID.
You can use the following SQL to confirm:
select object_name, object_type, status from dba_objects where object_name='WF_JAVA_DEFERRED_R' ;
R12.2 adop phase=prepare failed to execute bisdblrp.sql
WARNING: [AutoConfig Error Report]The following report lists errors AutoConfig encountered during each
phase of its execution. Errors are grouped by directory and phase.
The report format is:
<filename> <phase> <return code where appropriate>
[PROFILE PHASE]
AutoConfig could not successfully execute the following scripts:
Directory: /oaph/oracle/oaphappl/fs1/FMW_Home/webtier/perl/bin/perl -I /oaph/oracle/oaphappl/fs1/FMW_Home/webtier/perl/lib/5.10.0 -I
/oaph/oracle/oaphappl/fs1/FMW_Home/webtier/perl/lib/site_perl/5.10.0 -I /oaph/oracle/oaphappl/fs1/EBSapps/appl/au/12.0.0/perl -I
/oaph/oracle/oaphappl/fs1/FMW_Home/webtier/ohs/mod_perl/lib/site_perl/5.10.0/x86_64-linux-thread-multi
/oaph/oracle/oaphappl/fs1/inst/apps/OAPH_oacmph/admin/scripts/adexecsql.pl sqlfile=/oaph/oracle/oaphappl/fs1/inst/apps/OAPH_oacmph/admin/install
bisdblrp.sql INSTE8_PRF 1
Solution:
Drop the duplicate DB Links and then manually run the bisdblrp.sql script and the re-run autoconfig.
drop database link APPS_TO_APPS.WORLD (which is owned by obt_aa)
drop database link EDW_APPS_TO_WH.WORLD (which is owned by obt_aa)
Run the failing script (bisdblrp.sql) manually:
# cd /oaph/oracle/oaphappl/fs1/inst/apps/OAPH_oacmph/admin/install/
# sqlplus apps/<passwd>
SQL>@bisdblrp.sql
when prompted define the apps username, apps password and the DBNAME for this instance
utlrp.sql fails with: ORA-04045: errors during recompilation/revalidation of SYS.DBMS_REGISTRY_SYS
Issue :cd $ORACLE_HOME/rdbms/admin
sqlplus '/as sysdba'
SQL:/> @utlrp.sql
PL/SQL procedure successfully completed.
DROP function local_enquote_name
*
ERROR at line 1:
ORA-04045: errors during recompilation/revalidation of SYSTEM.DROPLOG_TRIGGER
ORA-01031: insufficient privileges
BEGIN dbms_registry_sys.validate_components; END;
*
ERROR at line 1:
ORA-04045: errors during recompilation/revalidation of SYS.DBMS_REGISTRY_SYS
ORA-01031: insufficient privileges
ORA-06508: PL/SQL: could not find program unit being called:
"SYS.DBMS_REGISTRY_SYS"
ORA-06512: at line 1
Solution:
Either disable the trigger (alter system disable trigger sys.NAMECHECK_BEFORE_DDL_DB_TRG)
OR
disable the execution of all triggers on system level (ALTER SYSTEM SET "_system_trig_enabled" = FALSE;)
Eg:
sqlplus '/as sysdba'
SQL:/> ALTER SYSTEM SET "_system_trig_enabled" = FALSE
Oracle Application R12.2 Log file Location
Admin server - $FMW_HOME/user_projects/domains/EBS_domain_$TWO_TASK/servers/AdminServer/logs/AdminServer.logoacore logfile - $FMW_HOME/user_projects/domains/EBS_domain_$TWO_TASK/servers/oacore_server1/logs/oacore_server1.log
oacore out file - $FMW_HOME/user_projects/domains/EBS_domain_$TWO_TASK/servers/oacore_server1/logs/oacore_server1.out
oacore diagnostic log - $FMW_HOME/user_projects/domains/EBS_domain_$TWO_TASK/servers/oacore_server1/logs/oacore_server1-diagnostic.log
oafm logfile - $FMW_HOME/user_projects/domains/EBS_domain_$TWO_TASK/servers/oafm_server1/logs/oafm_server1.log
oafm outfile - $FMW_HOME/user_projects/domains/EBS_domain_$TWO_TASK/servers/oafm_server1/logs/oafm_server1.out
oafm diagnostic log - $FMW_HOME/user_projects/domains/EBS_domain_$TWO_TASK/servers/oafm_server1/logs/oafm_server1-diagnostic.log
form server log - $FMW_HOME/user_projects/domains/EBS_domain_$TWO_TASK/servers/forms_server1/logs/forms_server1.log
form server access log - $FMW_HOME/user_projects/domains/EBS_domain_$TWO_TASK/servers/forms_server1/logs/access.log
form server out file - $FMW_HOME/user_projects/domains/EBS_domain_$TWO_TASK/servers/forms_server1/logs/forms_server1.out
form server diagnostic log - $FMW_HOME/user_projects/domains/EBS_domain_$TWO_TASK/servers/forms_server1/logs/forms_server1-diagnostic.log
forms-c4ws_server1 log - $FMW_HOME/user_projects/domains/EBS_domain_$TWO_TASK/servers/forms-c4ws_server1/logs/forms-c4ws_server1.log
forms-c4ws_server1 out file - $FMW_HOME/user_projects/domains/EBS_domain_$TWO_TASK/servers/forms-c4ws_server1/logs/forms-c4ws_server1.out
forms-c4ws_server1 diagnostic log - $FMW_HOME/user_projects/domains/EBS_domain_$TWO_TASK/servers/forms-c4ws_server1/logs/forms-c4ws_server1-diagnostic.log


ps -ef | grep "weblogic.Name=AdminServer"
ps -ef | grep "weblogic.Name=forms-c4ws_server"
ps -ef | grep "weblogic.Name=forms_server"
ps -ef | grep "weblogic.Name=oafm_server"
ps -ef | grep "weblogic.Name=oacore_server"
Apache Logs
cd $IAS_ORACLE_HOME/instances/*/diagnostics/logs/OHS/EBS_web_*/
OPMN Log
cd $IAS_ORACLE_HOME/instances/*/diagnostics/logs/OPMN/opmn/
Weblogic Logs
cd $IAS_ORACLE_HOME/../wlserver_10.3/common/nodemanager $EBS_DOMAIN_HOME/servers/oa*/logs/
$EBS_DOMAIN_HOME/servers/forms*/logs/ $EBS_DOMAIN_HOME/servers/AdminServer/logs/
$EBS_DOMAIN_HOME/sysman/log/
Error while launching forms on a SSL Enabled oracle apps 12.2
Installing Client JRE 1.8.0_25,1.7_76 or 1.7_75 for Server SSL Clients with Signed Jar Files results in New Untrusted Security Message (Doc ID 1981654.1)
'The connection to this website is untrusted'
URL = https://company.com:443
The certificate is not valid
Sol:
1. From the client, access: Control Panel->Java->Security->Certificates
2. User tab->Change drop down to 'Secure Site'
3. Import the server ssl certificate. Not the code signing certificate, but the server user ssl certificate.
R12.2 Dictionary Corrupted While Running adop TS Mismatch Error
12c
,
ADOP
,
AppsDBA
,
Oracle DBA
,
R12.2
No comments
:
adop phase=prepare failed with the following errors[STATEMENT] Updating prepare_status=R for session_id : 19
[UNEXPECTED]Dictionary Corrupted:
[START 2014/07/07 07:22:18] Data Dictionary Curruption Details
APPS OE_CREDIT_CHECK_ORDER_PVT V_20140516_0452 APPS OE_CREDIT_CHECK_UTIL V_20140516_0452 P Status: 5
APPS OKL_PAY_CURE_REFUNDS_PVT_W V_20140516_0452 APPS OKL_PAY_CURE_REFUNDS_PVT V_20140516_0452 P Status: 5
APPS OKL_PAY_CURE_REFUNDS_PUB_W V_20140516_0452 APPS OKL_PAY_CURE_REFUNDS_PUB V_20140516_0452 P Status: 5
APPS OKL_PAY_CURE_REFUNDS_PUB_W V_20140516_0452 APPS OKL_PAY_CURE_REFUNDS_PVT V_20140516_0452 P Status: 5
APPS INV_OPM_LOT_MIGRATION V_20140516_0452 APPS INV_LOT_API_PUB V_20140516_0452 TS mismatch: 12-JUN-14 16:50:54 29-JUN-14 14:42:12
APPS INV_LOT_ATTR_PUB V_20140516_0452 APPS INV_LOT_API_PUB V_20140516_0452 TS mismatch: 12-JUN-14 16:50:54 29-JUN-14 14:42:12
APPS INV_LOT_ATTR_PUB V_20140516_0452 APPS MTL_LOT_UOM_CONV_PVT V_20140516_0452 P Status: 5
Solution:
Fix Timestamp Mismatch Issues for Synonym, View, Package and Package Body
Note: This step is mandatory for New Vision Installation Customers. It is not necessary for new PROD installation customers.
Oracle strongly recommends all upgrade customers to execute this step to fix Timestamp mismatch issues in the database before starting to use the online patching utility (adop).
Upgrade Customers can refer to section 'Fix data dictionary or time stamp mismatch' in My Oracle Support Knowledge Document 1531121.1,
Using the Online Patching Readiness Report in Oracle E-Business Suite Release 12.2.
Download Patch 17268684:R12.AD.C.
Do not apply the Patch 17268684:R12.AD.C. You should instead execute instructions in the patch readme to fix timestamp mismatches for Synonym, View, Package and Package Body.
1.8 Create Snapshot
After your installation or upgrade is complete, run the AD Administration Maintain Snapshot option.
Run AD Administration (adadmin).
From the Main Menu, choose Maintain Applications Files > Maintain Snapshot Information.
Select Option 2, Update Current View Snapshot. Then, from the Snapshot sub-menu, select Option 1, Update Complete APPL_TOP.
ONLY if the steps above do not solve the issue consider following the steps below:
Warning, the following process can take up to and in excess of 10 hours to complete!
From $ORACLE_HOME/rdbms/admin, run the following steps on the Database tier:
1. Shutdown the database and open it in upgrade mode.
Source the 11.2.0.3 db environment.
From $ORACLE_HOME/rdbms/admin do the following:
sqlplus "/ as sysdba"
shutdown immediate
startup upgrade
2. From the same sqlplus session, run utlirp script:
@utlirp.sql
3. Bounce the database again and open it in normal mode.
From the same sqlplus session
shutdown immediate
startup
4. From the same sqlplus session, run the utlrp.sql from $ORACLE_HOME/rdbms/admin.
@utlrp.sql
5. Re-run adop.
R12.2 Context Files Are Out Of Sync FND_OAM_CONTEXT_FILES
12c
,
ADOP
,
AppsDBA
,
Oracle DBA
,
R12.2
,
RAC
No comments
:
ERROR Context Value Management Failed and java.lang.Exception: oracle.apps.ad.autoconfig.oamSymptom #1:
Looking in Oracle Application Manager (OAM), it shows that the context files are not synchronized for a particular node.
NOTE: Each Context File is stored in the file system and also in the "FND_OAM_CONTEXT_FILES" table. These Context Files should always be synchronized, when they do not match the following problem may occur.
Symptom #2:
When running Autoconfig, it fails with:
File system template : /ebs_prod/prd/appltier/prdappl/ad/11.5.0/admin/template/adxmlctx.tmp
Checking for customizations to Context template
Customizations found : None
----------------------------------------------------------------
File system Context file :/xxxx/prd/appltier/prdappl/admin/PROD_apps101.xml
Checking the Context file for possible updates from the Database
Comparing the Context file stored in database with the Context file in the
file system
Result : File system Context is below par with respect to the data base Context
Action to be taken : Copy the Data Base Context onto the file system
Result : Download of Context file failed
StackTrace:
java.lang.Exception: java.lang.Exception: oracle.apps.ad.autoconfig.oam.
FsCtxFileException: End tag does not match start tag 'oa_htmlbin'.
at oracle.apps.ad.tools.configuration.FileSysDBCtxMerge.updateFileSysContext(
FileSysDBCtxMerge.java:655)
at oracle.apps.ad.tools.configuration.FileSysDBCtxMerge.
updateFileSysFiles(FileSysDBCtxMerge.java:206)
at oracle.apps.ad.context.CtxValueMgt.mergeCustomInFiles(CtxValueMgt.java:1679)
at oracle.apps.ad.context.CtxValueMgt.processCtxFile(CtxValueMgt.java:1504)
at oracle.apps.ad.context.CtxValueMgt.main(CtxValueMgt.java:661)
ERROR: Context Value Management Failed.
Terminate.
Symptom #3:
Autoconfig may run fine on some nodes and fail with the above error on others.
Autoconfig Failed with Error: FsCtxFileException: Start of Root Element Expected
Error :
ERROR: FsCtxFile.XMLParseException
oracle.xml.parser.v2.XMLParseException: Start of root element expected.
at oracle.xml.parser.v2.XMLError.flushErrors1(XMLError.java:205)
at oracle.xml.parser.v2.NonValidatingParser.parseRootElement(NonValidatingParser.java:306)
at oracle.xml.parser.v2.NonValidatingParser.parseDocument(NonValidatingParser.java:268)
( or )
ERROR: FsCtxFile.XMLParseException
oracle.xml.parser.v2.XMLParseException: Unexpected EOF
col node_name format A20
col basepath format A20
col server_address format A20
col host format A20
col status format A10
set linesize 200
select node_name, basepath, server_address, host, status from fnd_nodes;
col NAME format A20
col VERSION format A12
col PATH format A110
col STATUS format A10
set linesize 200
select NAME,VERSION,PATH, STATUS from FND_OAM_CONTEXT_FILES;
Note:
By running the following sql query, it will help you identify if there are duplicate node_name entries in the FND_OAM_CONTEXT_FILES table.
If duplicates are listed, the older entry should be removed only leaving the most current entry.
SQL> select * from FND_OAM_CONTEXT_FILES where status in ('S','F') and name not in
('METADATA','TEMPLATE') and ctx_type='A';
Solution
Manually sync up the context files by removing the "bad" entry from FND_OAM_CONTEXT_FILES" and running Autoconfig to upload a new copy from the file system.1. Backup the FND_OAM_CONTEXT_FILES table:
$ sqlplus apps/apps_password
SQL> CREATE TABLE applsys.fnd_oam_context_files_bak AS SELECT * FROM applsys.fnd_oam_context_files;
2. Determine which context file is out of sync. You should have this information either from the Autoconfig log or by looking at the Context Files in OAM. For example, the Autoconfig log shows:
File system Context file :/xxxx/prd/appltier/prdappl/admin/PROD_apps101.xml
3. Locate the Context File you would like to remove in "FND_OAM_CONTEXT_FILES":
SQL> SELECT name, version, path, node_name, ctx_type FROM fnd_oam_context_files;
3.1. Confirm the "PATH" and the "NODE_NAME" is correct and matches the entry from the Autoconfig log.
3.2. Delete the row. If you use the following code block, you will be prompted for the 2 values you found in step 3.1. The values must match exactly (case sensitive).
SQL> DELETE FROM applsys.fnd_oam_context_files
WHERE node_name = '&enter_node_name'
AND path = '&enter_path_to_context_file';
4. Once the row has been deleted, run Autoconfig for the related node to reload the Context File into the database.
=================================================
Action Plan:
1) DELETE FROM applsys.fnd_oam_context_files WHERE node_name = 'pdhprd_pdhx01appp01' AND path = '/tmp/01232310/pdhx01appp01_VIS_apps2.xml';
2) rerun adop phase=prepare.
R12.2 Duplicate entries exists in FND_OAM_CONTEXT_FILES Tables in Apps Database.
12c
,
ADOP
,
AppsDBA
,
Oracle DBA
,
R12.2
,
Severity 1
No comments
:
The error message from the discovery process shows this is the cause of the issue as we can see in the message extracted from the log file:Caused by: oracle.apps.fnd.oam.em.sdk.targetData.discovery.AppsDiscoveryException: Duplicate entries exists in FND_OAM_CONTEXT_FILES Tables in Apps Database.
Please clean the table before running Discovery again.
Solution
1. Backup the fnd_oam_context_files table :
sqlplus applsys/pwd
create table fnd_oam_context_files_bkp as select * from fnd_oam_context_files;
2. truncate table fnd_oam_context_files;
3. Run autoconfig in the DB tiers to populate fnd_oam_context_files table with the database information;
4. Run autoconfig in each Apps tier to populate fnd_oam_context_files with the application tier information;
5. From the EBS agent home, run:
./emctl upload
This will upload the information from the EBS system to Grid Control
6. Re-run the Discovery process.
R12.2 adop phase=prepare Failed While Synchronizing Snapshots
12c
,
ADOP
,
AppsDBA
,
ASM
,
Oracle DBA
,
R12.2
,
RAC
No comments
:
Error: remote_execution_result_20150619_122924.xml file shows following error.Synchronizing Snapshots...
[ERROR] Failed to execute SQL statement :
begin
ad_zd_adop.sync_snapshots(342);
exception
when others then
update ad_adop_sessions set status='F'
where adop_session_id=8;
commit;
raise_application_error(-20001,'Error while calling ad_zd_adop.sync_snapshots.' || sqlerrm);
end;
Sol:
1. Execute the following script from SQL command prompt:
begin
ad_zd_adop.sync_snapshots(342);
exception when others then
raise_application_error(-20001,'Error while calling ad_zd_adop.sync_snapshots.' || sqlerrm);
end;
end;
/
2. rerun adop phase=prepare.
R12.2 Adop Phase=prepare Failed Error Patch service check failed
12c
,
ADOP
,
AppsDBA
,
Oracle DBA
,
R12.2
,
RAC
No comments
:
$AU_TOP/perl/ADOP/PreparePhase.pm has a sql statement "select count(service_id) from dba_services where name='ebs_patch' " to check the patch serviceRunning this sql from the PreparePhase.pm file on sqlplus returns 0 for lower case but returns 1 for uppercase.
Since query from PreparePhase.pm is expecting service in lower case it returns 0 and therefore thinks there is not patch service.
SQL> select count(service_id) from dba_services where name='ebs_patch';
COUNT(SERVICE_ID)
-----------------
0
Sol:
NOTE: These checks are highly recommended while working on this issue:
a. _system_trig_enabled database parameter is set to FALSE (should be true).
b. ADMINISTER DATABASE TRIGGER grants given to APPS user (should be revoked if granted).
c. Check for existence of EBS_LOGON trigger and if it is valid.
Please perform the below steps.
1. Delete the service_name running:
exec DBMS_SERVICE.DELETE_SERVICE(service_name =>'EBS_PATCH');
2. Then reset the service_name parameter
alter system set service_names = '<SID>','ebs_patch' ;
Now run again:
select count(service_id) from dba_services where name='ebs_patch';
This time it should return 1.
SQL> show parameter service;
NAME TYPE VALUE
------------------------------------ ----------- ------------------------------
service_names string UPG, ebs_patch
3. run adop phase=prepare
SQL> select count(service_id) from dba_services where name='ebs_patch';
COUNT(SERVICE_ID)
-----------------
1
R12.2 patch is taking way too much time, almost 24h
12c
,
ADOP
,
AppsDBA
,
Oracle DBA
,
R12.2
,
RAC
No comments
:
60 2220972027 SYSTEM 14840 SELECT RIDX.OWNER OWNER , RIDX.INDEX_NAME REVISED_INDEX , RIDX.TABLE_OWNER TABLE_OWNER , RIDX.TABLE_NAME TABLE_NAME , OIDX.INDEX_NAME ORIGINAL_INDEX , CON.CONSTRAINT_NAME CONSTRAINT_NAME FROM DBA_INDEselect sql_text from v$sqltext where hash_value=2220972027 order by piece asc;
EXEC DBMS_STATS.GATHER_DICTIONARY_STATS;
exec DBMS_STATS.GATHER_FIXED_OBJECTS_STATS;
R12.2 ADZDWRKR.sql Is Running On 8 Workers For Long Time
12c
,
ADOP
,
AppsDBA
,
Oracle DBA
,
R12.2
,
RAC
No comments
:
Sol:SQL> show parameter max_dump_file_size
NAME TYPE VALUE
------------------------------------ ----------- ------------------------------
max_dump_file_size string 20480
2) Inscreasing the max_dump_file_size
a- Change the max_dump_file_size = unlimited
b- Restart the Database
c- Rerun adop session
Oracle Application R12.2 Weblogic and Apps Password Change
1) Login to weblogic admin console.


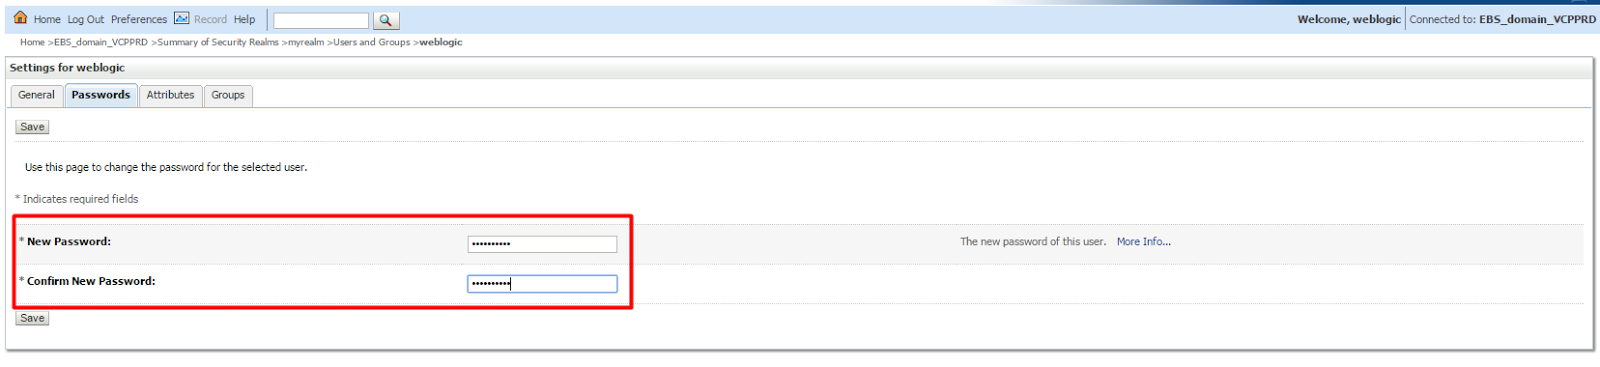


Take a backup and update “boot.properties” files under “$FMW_HOME/ user_projects/domains/EBS_domain_VCPPRD/servers/AdminServer/security/” and all the managed servers’ directories (“$FMW_HOME/ user_projects/domains/EBS_domain_VCPPRD/servers/<managed_servers>/security/”) with the following entries
username=weblogic
password=<new_weblogic_password>
20) Move “cache” and “data” directories under all Managed Server directories (“$FMW_HOME/ user_projects/domains/EBS_domain_VCPPRD/servers/<managed_servers>/). They will be created automatically during startup.
21) Restart all weblogic services (Admin Server, NodeManager and all Managed Servers)
22) Verify that all services are in running State with good Health

VCPPRD APPS PASSWORD CHANGE
1) Shutdown all application tier services (all nodes)
2) Take a backup of the tables “FND_USER” and “FND_ORACLE_USERID” (preferably into a different schema)
3) Change the APPLSYS password
FNDCPASS apps/<old_apps_password> 0 Y system/<system_password> SYSTEM APPLSYS <new_apps_password>
4) Check FNDCPASS log to verify password change was successful.
5) Start just Admin Server using script “adadminsrvctl.sh”
6) Login to the Admin Console and click on “Lock & Edit”

7) Click on “Data Sources” under Services of “EBS_domain_VCPPRD” domain structure tree

8) Click on “EBSDataSource”

9) Click on “Connection Pool” sub-tab under Configuration tab

10) Enter the new apps password under the fields “Password” and “Confirm Password” (the same new apps password which we gave at FNDCPASS earlier)

11) Click on “Save”

12) Verify: Confirm the message “Settings updated successfully.” was displayed

13) Click on “Activate Changes”

14) Verify: Confirm the message “All changes have been activated. No restarts are necessary.” was displayed

15) Perform the same steps (Step 8 to 14) for “OAEADatasource” too
16) Shutdown Admin Server
17) Run “autoconfig” on application tier
18) Start application tier services
19) Verify that all services are in running State with good Health. Further, test all the data-sources
<data_source_name> ? Monitoring ? Testing ? <click_on_server> ? <click_on_Test Data Source_>

R12.2.3 adop phase=fs_clone txkADOPPreparePhaseSynchronize.pl failed exit code 255
ADOP
,
AppsDBA
,
R12.2
,
Severity 1
No comments
:
When attempting to apply patch p18123067_R12.FND.C_R12_GENERIC.zip,ERROR
-----------------------
CLONE2014-03-14_02-33-17PM.error
WARNING : Mar 14, 2014 2:33:21 PM - ERROR - CLONE-20263 Invalid Oracle Inventory.
WARNING : Mar 14, 2014 2:33:21 PM - CAUSE - CLONE-20263 There are two possible causes for an invalid OraInventory "/u01/PROD/oraInventory".
1. Inventory was empty.
2. It did not have valid inventory.xml file.
WARNING : Mar 14, 2014 2:33:21 PM - ACTION - CLONE-20263 Provide a valid Oracle Inventory.
The inventory directory does not exist.
1. /etc/oraInct.loc ==> /u01/PAT/oraInventory (customer's OLD PAT Centralized Inventory Directory)
2. "/u01/PROD/oraInventory" Des Not exist on the instance.
Sol
1. change the setting for /etc/oraInventory.loc to an existing directory
2. run adop phase=fs_clone force=yes OR adop phase=fs_clone
ERROR Script failed exit code 255 fs_clone Failed
ADOP
,
AppsDBA
,
Oracle DBA
,
R12.2
No comments
:
1. Run: adop phase= fs_cloneChecked log file FSCloneStageAppsTier_xxxxxxxx.log found following error:
START: Creating WLS config archive.
Script Executed in 13420 milliseconds, returning status 255
ERROR: Script failed, exit code 255
adop exiting with status = 2 (Fail)
The managed servers are not up.
Sol.
1. Shut down all the services running from RUN file system using below command:
$ADMIN_SCRIPTS_HOME/adstpall.sh
2. Ensure that no processes are running from PATCH file system. Use the "ps"
command for the same. If some process are running, kill it.
3. Run AutoConfig on the RUN file system.
4. Start all the services on the RUN file system using below command:
$ADMIN_SCRIPTS_HOME/adstrtal.sh
5. Re-run FS_CLONE using the following command:
adop phase=fs_clone force=yes
dba network acls
12c
,
AppsDBA
,
Oracle DBA
,
R12.2
,
Severity 1
No comments
:
dba_network_aclsoraprd@edp01dbadm01:/erp_admin/app/erp/SCALE $ cat ACL2.sql
#Run the following procedure to create ACL for the above #listed URL's
BEGIN
dbms_network_acl_admin.assign_acl (
acl => '/sys/acls/OracleEBS.xml',
host => '*'
);
END;
/
commit;
ERROR:Unable to register the host ebsx01appd06 with domain EBS_domain_ebspat
ADOP
,
AppsDBA
,
R12.2
,
Severity 1
,
Weblogic
No comments
:
PREPARE in EBSPAT has failed with following error in logs*******FATAL ERROR*******
PROGRAM : (/u11/home/ebspat/fs1/EBSapps/appl/ad/12.0.0/patch/115/bin/txkADOPPreparePhaseSynchronize.pl)
TIME : Tue Jan 19 11:09:53 2016
FUNCTION: main::migrateCloneComponentApply [ Level 1 ]
ERRORMSG: /u11/home/ebspat/fs1/EBSapps/appl/ad/12.0.0/bin/adclone.pl did not go through successfully.
Enrolling this machine with the domain directory at /u11/home/ebspat/fs2/FMW_Home/user_projects/domains/EBS_domain_ebspat ...
ERROR: Unable to enrol the domain home '/u11/home/ebspat/fs2/FMW_Home/user_projects/domains/EBS_domain_ebspat' with the Node Manager
ERROR: Unable to register the host ebsx01appd06 with domain EBS_domain_ebspat
ERROR: Can't proceed further.
*************************
Sol:
adnodemgrctl.sh stop
adnodemgrctl.sh start
run adop phase=prepare
There is no issue but just failed communication with node manager , restarting node manager and running prepare should work.
===================
Logs Need to Check.
view RUN_ebspat_ebsx01appd06.xml
view RUN_fsclone_config.txt
view PATCH_fsclone_config.txt
view 101_STARTED.out
view getCtxFileStatus.log
view 101_CLONECONTEXT-DONE.out
view getWLSStatus.log
view txkADOPPreparePhaseSynchronize.log
cd wlsConfig_stage
view FSCloneStageAppsTier_01191109.log
cd ../wlsConfig_apply
view FSCloneApplyAppsTier_01191109.log
cd wlserver_10.3
server/
common/
cd nodemanager/
view nodemanager.domains
ps ux|grep NodeManager
cd $FMW_HOME
ssh ebsx01appd06
wlserver_10.3
nmHome12
view nodemanager.log
ORA-04063: package body "APPS.AD_ZD_PREP" has errors adop prepare phase failed
ADOP
,
AppsDBA
,
Oracle DBA
,
R12.2
,
Severity 1
No comments
:
[applint2@ebsx01appd10 ~]$ adop phase=prepareEnter the APPS password:
Enter the SYSTEM password:
Enter the WLSADMIN password:
Validating credentials...
Initializing...
Run Edition context : /u15/home/ebsint2/fs1/inst/apps/ebsint2_ebsx01appd10/appl/admin/ebsint2_ebsx01appd10.xml
Patch edition context: /u15/home/ebsint2/fs2/inst/apps/ebsint2_ebsx01appd10/appl/admin/ebsint2_ebsx01appd10.xml
Patch file system freespace: 422.31 GB
Validating system setup...
Node registry is valid.
Logfile location /u15/home/ebsint2/fs1/inst/apps/ebsint2_ebsx01appd10/logs/appl/rgf/TXK/verifyssh.log
xml output = /u15/home/ebsint2/fs1/inst/apps/ebsint2_ebsx01appd10/logs/appl/rgf/TXK/out.xml
Remote execution is operational.
[ERROR] Failed to execute SQL statement :
declare
l_msg varchar2(4000);
begin
ad_zd_adop.adop_database_validations(l_msg);
dbms_output.put_line(l_msg);
end;
[ERROR] Error Message :
[ERROR] ORA-04063: package body "APPS.AD_ZD_PREP" has errors
[ERROR] ORA-06508: PL/SQL: could not find program unit being called: "APPS.AD_ZD_PREP"
[ERROR] ORA-06512: at "APPS.AD_ZD_ADOP", line 2443
[ERROR] ORA-06512: at line 4 (DBD ERROR: OCIStmtExecute)
[UNEXPECTED]Error occurred while performing database validations
[STATEMENT] Please run adopscanlog utility, using the command
"adopscanlog -latest=yes"
to get the list of the log files along with snippet of the error message corresponding to each log file.
adop exiting with status = 1 (Fail)
Sol:
Tried to compile the package "AD_ZD_PREP" but failed with the following error
SQL> alter package AD_ZD_PREP compile body;
Warning: Package Body altered with compilation errors.
SQL> sho errors
Errors for PACKAGE BODY AD_ZD_PREP:
LINE/COL ERROR
-------- -----------------------------------------------------------------
419/3 PL/SQL: SQL Statement ignored
419/19 PL/SQL: ORA-00942: table or view does not exist
423/5 PL/SQL: SQL Statement ignored
423/21 PL/SQL: ORA-00942: table or view does not exist
457/5 PL/SQL: SQL Statement ignored
457/21 PL/SQL: ORA-00942: table or view does not exist
SQL>
SQL> desc DBMS_OBJECTS_APPS_UTILS
ERROR:
ORA-04043: object DBMS_OBJECTS_APPS_UTILS does not exist
Issue was grants on the sys object "xdb$moveSchemaTab" to apps
SQL> grant select,update,delete,insert on sys.xdb$moveSchemaTab to apps;
Grant succeeded.
Now compiled the package "AD_ZD_PREP"
SQL> alter package apps.AD_ZD_PREP compile body;
Package body altered.
SQL>
run [applint2@ebsx01appd10 ~]$ adop phase=prepare
ADOP cycle completed without any further issues, cause for the above issue could be failed run of adgrants.sql
MSCA Authentication Failed error R12.2
MSCA: MWA Authentication Failed error$ cd $MWA_TOP/bin
$ ps -ef|grep 10200
oraprod 17027 1 0 Jun16 ? Sl 0:48 /opt/jdk/bin/java -DPID=17021 -Doracle.apps.mwa=/u02/appprod/prodappl/mwa/11.5.0 -mx512m -ms128m oracle.apps.mwa.presentation.telnet.Listener 10200
oraprod 21554 19963 0 05:00 pts/3 S+ 0:00 grep 10200
$ ps -ef|grep 10300
oraprod 17059 1 30 Jun16 ? Sl 742:11 /opt/jdk/bin/java -DPID=17053 -Doracle.apps.mwa=/u02/appprod/prodappl/mwa/11.5.0 -mx512m -ms128m oracle.apps.mwa.presentation.telnet.Listener 10300
oraprod 21580 19963 0 05:00 pts/3 S+ 0:00 grep 10300
$ ./mwactl.sh -login apps/password stop_force 10200
MWA Telnet Server Release: 1.0.8.4 [December 12th 2002]
Telnet server shut down successfully.
$ ./mwactl.sh -login apps/password stop_force 10300
MWA Telnet Server Release: 1.0.8.4 [December 12th 2002]
Error: ServerManagerListener returned 'AUTHENTICATION_FAILED'
mwactl: Error shutting down Telnet server
$ ./mwactl.sh -login apps/password stop_force 10400
MWA Telnet Server Release: 1.0.8.4 [December 12th 2002]
Error: ServerManagerListener returned 'AUTHENTICATION_FAILED'
mwactl: Error shutting down Telnet server
$ ps -ef|grep 10300
oraprod 17059 1 30 Jun16 ? Sl 742:57 /opt/jdk/bin/java -DPID=17053 -Doracle.apps.mwa=/u02/appprod/prodappl/mwa/11.5.0 -mx512m -ms128m oracle.apps.mwa.presentation.telnet.Listener 10300
oraprod 22006 19963 0 05:01 pts/3 S+ 0:00 grep 10300
$ kill -9 17059
$ ps -ef|grep 10400
oraprod 7845 1 0 Jun17 ? Sl 0:59 /opt/jdk/bin/java -DPID=7843 -Doracle.apps.mwa=/u02/appprod/prodappl/mwa/11.5.0 -mx512m -ms128m oracle.apps.mwa.presentation.telnet.Listener 10400
oraprod 22063 19963 0 05:01 pts/3 S+ 0:00 grep 10400
$ kill -9 7845
$ ps -ef|grep 10200
oraprod 22169 19963 0 05:01 pts/3 S+ 0:00 grep 10200
$ ./mwactl.sh start 10200
Created server socket : listening on port 10200
Server startup is successful.
MWA Telnet Server Release: 1.0.8.4 [December 12th 2002]
$ ./mwactl.sh start 10300
Created server socket : listening on port 10300
Server startup is successful.
$ ./mwactl.sh start 10400
MWA Telnet Server Release: 1.0.8.4 [December 12th 2002]
$ Created server socket : listening on port 10400
Server startup is successful.
Data block corruption in particular datafile
Find the Data block corruption details:SELECT name FROM v$datafile WHERE file#=34;
SELECT ts# "TSN" FROM v$datafile WHERE file#=34;
SELECT tablespace_name FROM dba_data_files WHERE file_id=34--APPS_TS_TX_DATA
SELECT block_size FROM dba_tablespaces
WHERE tablespace_name =
(SELECT tablespace_name FROM dba_data_files WHERE file_id=&AFN);---8192
SELECT tablespace_name, file_id "AFN", relative_fno "RFN" FROM dba_data_files;
SELECT *
FROM dba_extents
WHERE file_id = &AFN
and &BL between block_id AND block_id + blocks - 1;
SELECT *
FROM dba_free_space
WHERE file_id = 34
and 682478 between block_id AND block_id + blocks - 1;
Sol:
RMAN> run {blockrecover datafile 34 block 682478;}
RMAN> backup check logical validate datafile 34;
analyze table PA.PA_COST_XXX_ALL validate structure online;
If table has analyzed your in good shape.
If it is not analyzed and it shows again datafile has been corrupted.
SQL> alter table PA.PA_COST_XXXX_LINES_ALL move;
Table altered.
SELECT * FROM dba_free_space WHERE file_id = 34 and 682478 between block_id AND block_id + blocks - 1;
Return any rows it means block has been changed.rebuild the indexes on this table.
select * from V$DATABASE_BLOCK_CORRUPTION;
no rows selected.
Now there is no db blocks on Database.
Note: 28814.1 - Handling Oracle Block Corruptions in Oracle7/8/8i/9i/10g/11g
Note: 403747.1 - FAQ: Physical Corruption
Note: 68117.1 - Introduction to the Corruption Category
Note: 840978.1 - Physical and Logical Block Corruptions. All you wanted to know about it
How to reset the Weblogic admin server password
Step 1:Set the following environment variables (update the domain name as appropriate):
export FMW_HOME=/u01/app/oracle/product/middleware
export DOMAIN_HOME=$FMW_HOME/user_projects/domains/<domain_name>
export CLASSPATH=$CLASSPATH:$MW_HOME/wlserver_10.3/server/lib/weblogic.jar
Run the env as shown below.
. $DOMAIN_HOME/bin/setDomainEnv.sh
Step 2:
Shut down your weblogic domain:
$DOMAIN_HOME/bin/stopWebLogic.sh
Step 3:
Rename and backup the DefaultAuthenticatorInit.ldift file as shown below,
cd $DOMAIN_HOME/security
mv DefaultAuthenticatorInit.ldift DefaultAuthenticatorInit.ldift.old
Now run the following command to generate a new DefaultAuthenticatorInit.ldift file. ((here ‘weblogic’ is default username))
java weblogic.security.utils.AdminAccount <username> <new_password> .
Note: Don't forget the period "." at the end of the this command, otherwise you will get "Error: Invalid arguments"
Rename and backup the following LDAP directory.
mv $DOMAIN_HOME/servers/AdminServer/data/ldap $DOMAIN_HOME/servers/AdminServer/data/ldap.old
(This ldap directory will be recreated once weblogic server startup time)
Step 4:
Back and Edit the boot.properties file and update the new password. (Above new_password)
cd $DOMAIN_HOME/servers/AdminServer/security
cp boot.properties boot.properties_old
vi boot.properties
password=<username>
username=<new_password>
(Note: New password will be encrypted once server starts)
Step 5:
Now start your weblogic domain.
[oracle@fa bin]# cd /root/MW_home/user_projects/domains/base_domain/bin/
[oracle@fa bin]# ls
nodemanager nohup.out server_migration service_migration setDomainEnv.sh
startManagedWebLogic.sh startWebLogic.sh stopManagedWebLogic.sh stopWebLogic.sh
[oracle@fa bin]# nohup ./startWebLogic.sh &
[oracle@fa bin]# nohup: appending output to `nohup.out'
[oracle@fa bin]# tail -f nohup.out
Server state during the startup:
<Aug 7, 2013 11:07:18 AM IST> <Notice> <WebLogicServer> <BEA-000365> <Server state changed to STANDBY>
<Aug 7, 2013 11:07:18 AM IST> <Notice> <WebLogicServer> <BEA-000365> <Server state changed to STARTING>
<Aug 7, 2013 11:07:21 AM IST> <Notice> <WebLogicServer> <BEA-000365> <Server state changed to ADMIN>
<Aug 7, 2013 11:07:21 AM IST> <Notice> <WebLogicServer> <BEA-000365> <Server state changed to RESUMING>
<Aug 7, 2013 11:07:22 AM IST> <Notice> <WebLogicServer> <BEA-000365> <Server state changed to RUNNING>
<Aug 7, 2013 11:07:22 AM IST> <Notice> <WebLogicServer> <BEA-000360> <Server started in RUNNING mode>
How to Kill Inactive session in Oracle Database
Find the current locked session using the following query.select sid,
decode(block, 0, 'NO', 'YES') BLOCKER,
decode(request,0,'NO','YES') WAITER
from v$lock
where (request > 0 or block > 0)
AND decode(block ,0,'NO','YES') ='YES'
order by block desc;
Run the above query in some time interval to understand whether the locked session ID is temporary or permanent.
Run the below query to get the serial# along with the session ID. Pass value of the "" whatever you have got from above query.
SELECT l.session_id||','||v.serial# sid_serial,
l.ORACLE_USERNAME ora_user,
o.object_name,
o.object_type,
DECODE(l.locked_mode,
0, 'None',
1, 'Null',
2, 'Row-S (SS)',
3, 'Row-X (SX)',
4, 'Share',
5, 'S/Row-X (SSX)',
6, 'Exclusive',
TO_CHAR(l.locked_mode)
) lock_mode,
o.status,
to_char(o.last_ddl_time,'dd.mm.yy') last_ddl
FROM dba_objects o, gv$locked_object l, v$session v
WHERE o.object_id = l.object_id
and l.SESSION_ID=v.sid
and l.SESSION_ID =
order by 2,3;
Use the output of the above query to kill the particular session using the below sql query.
ALTER SYSTEM KILL SESSION '231,23454'
OR
kill -9 PID on OS level
How to Disable all scheduled Concurrent Request in R12.2
AppsDBA
,
CM
,
R12.2
No comments
:
update fnd_concurrent_requestsset phase_code = 'C', status_code = 'X'
where status_code in ('Q','I')
and requested_start_date > SYSDATE
and hold_flag = 'N';
/
commit;
/
fix:
STATUS_CODE Column:
A Waiting
B Resuming
C Normal
D Cancelled
E Error
F Scheduled
G Warning
H On Hold
I Normal
M No Manager
Q Standby
R Normal
S Suspended
T Terminating
U Disabled
W Paused
X Terminated
Z Waiting
PHASE_CODE column
C Completed
I Inactive
P Pending
R Running
metalink reference articles.
170107.1 and 152209.1
Automatic Storage Management ( ASM )
AppsDBA
,
ASM
,
Oracle DBA
,
RAC
No comments
:
Automatic
Storage Management (ASM)
Oracle Database
10g Release 1, introduced Automatic Storage Management (ASM),
a new framework for managing Oracle database files,
to bypass the OS overhead,
to simplify Oracle data management,
to enforce the SAME (Stripe And Mirror Everywhere,
RAID10), and
to provide a platform for file sharing in RAC and Grid computing.
Automatic Storage Management (ASM) is a new type of file
system. ASM provided a foundation for highly efficient storage management with
kernelized asynchronous I/O, direct I/O, redundancy, striping, and an
easy way to manage storage. ASM is recommended file system for RAC and single instance ASM for
storing database files. This provides direct I/O to the file and performance is
comparable with that provided by raw devices. Oracle creates a separate instance
for this purpose.
ASM includes volume management functionality similar to that of a
generic logical volume manager. Automatic StorageManagement (ASM) will
take physical disk partitions and manages their contents in a way that
efficiently supports the files needed to create an Oracle database.
Automatic Storage Management (ASM) simplifies administration
of Oracle related files by allowing the administrator to reference diskgroups
rather than hundreds of individual disks and files, which are managed
by ASM. The ASM functionality is an extension of the Oracle Managed Files (OMF)
functionality that also includes striping and mirroring to provide balanced and
secure storage. The ASM functionality can be used in combination with existing
raw and cooked file systems, along with OMF and manually managed files.
Before ASM, there were only two choices: file system storage and
raw disk storage. File system storage is flexible, allowing the DBA to see the individual files
and to move them, copy them, and back them up easily, but it also incurs
overhead. Raw disk storage has no file directories on it, and Oracle manages
its blocks directly, which makes it more efficient. Raw disk storage is such a
manageability nightmare that few DBAs use it.
ASM is the middle ground. It's raw disk storage managed by Oracle,
and it is very efficient. Oracle uses a scaled down Oracle instance to simulate
a file structure on it where none exists, by recording all the metadata. The
metadata enables the Recovery Manager
(RMAN) to backup and restore Oracle files easily within it.
Setting up storage takes a significant amount of time during most
database installations. Zeroing on a specific disk configuration from among the
multiple possibilities requires careful planning and analysis, and most
important, intimate knowledge of storage technology, volume managers, and file
systems. The design tasks at this stage can be loosely described as follows:
1.
Confirm that storage is recognized at the OS level and determine
the level of redundancy protection that might already be provided (hardware
RAID, called external redundancy in ASM).
2.
Assemble and build logical volume groups and determine if
striping or mirroring is also necessary.
3.
Build a file system on the logical volumes created by the logical
volume manager.
4.
Set the ownership and privileges so that the Oracle process can
open, read, and write to the devices.
5.
Create a database on that file system while taking care to create
special files such as redo logs, temporary
tablespaces, and undo tablespaces in
non-RAID locations, if possible.
All above tasks, striping, mirroring, logical file system building, are done to serve Oracle database. Oracle database offers some techniques of its own to simplify or enhance the process. Lets DBAs execute many of the above tasks completely within the Oracle framework. Using ASM you can transform a bunch of disks to a highly scalable and performance file system/volume manager using nothing more than what comes with Oracle database software at no extra cost and you don't need to be an expert in disk, volume managers, or file system management.
You can store the following file types in ASM diskgroups:
o
Datafiles
o
Control files
o
Online redo logs
o
Archive logs
o
Flashback logs
o
SPFILEs
o
RMAN backups
o
Temporary datafiles
o
Datafile copies
o
Disaster recovery configurations
o
Change tracking bitmaps
o
Datapump dumpsets
·
Download Pdf
·
Manages
·
How to download pdf
·
Las vegas hotel offers
·
Dictionarys
In summary, ASM provides the following functionality/features:
·
Manages groups of disks, called diskgroups. Must be careful while
choosing disks for a diskgroup.
·
Manages disk redundancy within a diskgroup.
·
Provides near-optimal I/O balancing without any manual tuning.
·
Enables management of database objects without specifying mount
points and filenames.
·
Supports large files.
·
Replacement for CFS (Cluster File System).
·
Also useful for Non-RAC databases.
·
A new instance type - ASM is introduced in 10g.
·
ASM instance has no data dictionary.
·
A Disk can be a partial, full or a LUN from the RG.
·
I/O is spread evenly across all disks of a diskgroup.
·
Disks can be dynamically added to any diskgroup.
·
When combined with OMF increases manageability.
·
ASM cannot maintain empty directories “delete input” has issues,
create a dummy directory.
·
Use of ASM diskgroup is very simple create tablespace.
·
Enterprise Manager can also be used for administering diskgroups
·
Only RMAN can be used with ASM.
·
Introduces three additional Oracle
background processes – RBAL, ARBx and ASMB.
o
ASMB - This ASMB process is used to provide information to and
from cluster synchronization services used by ASM to manage the disk resources.
It's also used to update statistics and
provide a heart beat mechanism.
o
Re-Balance, RBAL - RBAL is the ASM related process that performs
rebalancing of disk resources controlled by ASM.
o
Actual Rebalance, ARBx - ARBx is configured by ASM_POWER_LIMIT.
·
ASM instance has it own set of v$views and init.ora parameters.
The advantages of ASM are
§ Disk
Addition - Adding a disk is very easy. No downtime is required and file extents
are redistributed automatically.
§ I/O
Distribution - I/O is spread over all the available disks automatically,
without manual intervention, reducing chances of a hot spot.
§ Stripe
Width - Striping can be fine grained as in redolog files (128K for faster
transfer rate) and coarse for datafiles (1MB for transfer of a large number of
blocks at one time).
§ Mirroring
- Software mirroring can be set up easily, if hardware mirroring is not
available.
§ Buffering
- The ASM file system is not buffered, making it direct I/O capable by design.
§ Kernelized Asynchronous I/O
- There is no special setup necessary to enable kernelized asynchronous I/O,
without using raw or third-party file systems such as Veritas Quick I/O.
ASM
Instance
The ASM functionality is controlled by an ASM instance. This is a
special instance, not a database where users can create objects, just the
memory structures and as such is very small and lightweight.
With ASM, you don't have to create anything on the OS side; the
feature will group a set of physical disks to a logical entity known as a
diskgroup. A diskgroup is analogous to a striped and optionally mirrored, file
system, with important differences: it's not a general-purpose file system for
storing user files and it's not buffered. Diskgroup offers the advantage of
direct access to this space as a raw device, yet provides the convenience and
flexibility of a file system. All the metadata about the disks are stored in
the diskgroups themselves, making them as self-describing as possible.
This special ASM instance is similar to other file systems in that
it must be running for ASM to work and can't be modified by the user. One ASM
instance can serve number of Oracle databases. ASM instance and database
instances have to be present on same server. Otherwise it will not work.
Logical volume managers typically use a function, such as hashing,
to map the logical address of the blocks to the physical blocks. This
computation uses CPU cycles. When a new disk is added, this typical striping
function requires each bit of the entire data set to be relocated. In contrast,
ASM uses this special instance to address the mapping of the file extents to
the physical disk blocks. This design, in addition to being fast in locating
the file extents, helps while adding or removing disks because the locations of
file extents need not be coordinated.
You should start the instance up when the server is booted i.e. it
should be started before the database instances, and it should be one of the
last things stopped when the server is shutdown. From 11.2.0,
we can use ASMCMD to
start and stop the ASM instances.
The initialization parameters that are specific to an ASM instance
are:
·
INSTANCE_TYPE - Set to ASM. The default is RDBMS.
·
ASM_DISKGROUPS - The list of diskgroups that should be mounted by
an ASM instance during instance startup, or by the ALTER DISKGROUP ALL MOUNT
statement. ASM configuration changes are automatically reflected in this
parameter.
·
ASM_DISKSTRING - Specifies a value that can be used to limit the
disks considered for discovery. The default value is NULL allowing all suitable
disks to be considered. Altering the default value may improve the speed of
diskgroup mount time and the speed of adding a disk to a diskgroup. Changing
the parameter to a value which prevents the discovery of already mounted disks
results in an error.
·
ASM_POWER_LIMIT -The maximum power for a rebalancing operation on
an ASM instance. The valid values range from 1 (default) to 11. The higher the
limit the more resources are allocated resulting in faster rebalancing
operations. This value is also used as the default when the POWER clause is
omitted from a rebalance operation. A value of 0 disables rebalancing.
·
ASM_PREFERRED_READ_FAILURE_GROUPS - This initialization parameter
value (default is NULL) is a comma-delimited list of strings that specifies the
failure groups that should be preferentially read by the given instance. This
parameter is generally used only for clustered ASM instances and its value can
be different on different nodes. This is from Oracle 11g.
·
DB_UNIQUE_NAME - Specifies a globally unique name for the
database. This defaults to +ASM but must be altered if you intend to run
multiple ASM instances.
To create an ASM instance first create pfile, init+ASM.ora, in the
/tmp directory, containing the following parameter.
INSTANCE_TYPE = ASM
Next, connect to the ideal instance.
$ export ORACLE_SID=+ASM
SQL> sqlplus "/as sysdba"
Create a spfile using the contents of the init+ASM.ora file.
SQL> CREATE SPFILE FROM PFILE='/tmp/init+ASM.ora';
SQL> startup nomount
ASM instance started
Total System Global Area 130023424 bytes
Fixed Size 2028368 bytes
Variable Size 102829232 bytes
ASM Cache 25165824 bytes
The ASM instance is now ready to use for creating and mounting
diskgroups.
Once an ASM instance is present, diskgroups can be used for the
following parameters in database instances (INSTANCE_TYPE=RDBMS) to allow ASM
file creation:
·
CONTROL_FILES
·
DB_CREATE_FILE_DEST
·
DB_CREATE_ONLINE_LOG_DEST_n
·
DB_RECOVERY_FILE_DEST
·
LOG_ARCHIVE_DEST_n
·
LOG_ARCHIVE_DEST
·
STANDBY_ARCHIVE_DEST
Startup of ASM Instances
ASM instances are started and
stopped in a similar way to normal database instances.
·
Dictionary english to spanish
·
English dictionary online
·
Transfer
·
Followers
·
First mover advantage
The options for the STARTUP command are:
·
NOMOUNT - Starts the ASM instance without mounting any diskgroups.
·
MOUNT - Starts the ASM instance and mounts the diskgroups
specified by the ASM_DISKGROUPS parameter.
·
OPEN - ASM instance does not have open stage.
·
FORCE - Performs a SHUTDOWN ABORT before restarting the ASM
instance.
ASMCMD equivalent
for this command is startup (11g R2 command).
Shutdown of ASM Instances
The options for the SHUTDOWN command are:
Shutdown of ASM Instances
The options for the SHUTDOWN command are:
·
NORMAL - The ASM instance waits for all connected ASM instances
and SQL sessions to exit then shuts down.
·
IMMEDIATE - The ASM instance waits for any SQL transactions to
complete then shuts down. It doesn't wait for sessions to exit.
·
TRANSACTIONAL - Same as IMMEDIATE.
·
ABORT - The ASM instance shuts down instantly.
ASMCMD equivalent
for this command is shutdown (11g
R2 command).
ASM Diskgroups
ASM Diskgroups
The main components of ASM are diskgroups, each of which comprise
of several physical disks that are controlled as a single unit. The physical
disks are known as ASM disks, while the files that reside on the disks are
known as ASM files. The locations and names for the files are controlled by
ASM, but user-friendly aliases and directory structures can be defined for ease
of reference.
Diskgroup is a terminology used for logical structure which holds
the database files. Each diskgroup consists of disks/raw devices where the
files are actually stored. Any ASM file (and it's redundant copy) is completely
contained within a single diskgroup. A diskgroup might contain files belonging
to several databases and a single database can use files from multiple
diskgroups.
In the initial release of Oracle 10g,
ASM diskgroups were a black box. We had to manipulate ASM diskgroups with SQL
statements while logged in to the special ASM instance that manages the
diskgroups.
In Oracle 10g
Release 2, Oracle introduced a new command line tool called ASMCMD that
lets you look inside ASM volumes (which are called diskgroups). Now you can do
many tasks from the command line.
While creating a diskgroup, we have to specify an ASM diskgroup
type based on one of the following three redundancy levels:
·
Normal redundancy - for 2-way mirroring, requiring two failure
groups, when ASM allocates an extent for a normal redundancy file, ASM
allocates a primary copy and a secondary copy. ASM chooses the disk on which to
store the secondary copy in a different failure group other than the primary
copy.
·
High redundancy - for 3-way mirroring, requiring three failure
groups, in this case the extent is mirrored across 3 disks.
·
External redundancy - to not use ASM mirroring. This is used if
you are using hardware mirroring or third party redundancy mechanism like RAID,
Storage arrays.
ASM is supposed to stripe the data and also mirror the data (if
using Normal, High redundancy). So this can be used as an alternative for RAID
(Redundant Array of Inexpensive Disks) 0+1 solutions.
No, we cannot modify the redundancy for diskgroup once it has been
created. To alter it we will be required to create a new diskgroup and move the
files to it. This can also be done by restoring full backup on the new
diskgroup.
Failure groups are defined within a diskgroup to support the
required level of redundancy, using normal/high redundancy. They contain the
mirrored ASM extents and must be containing different disks and preferably on
separate disk controller.
In addition failure groups and preferred names for disks can be
defined in CREATE DISKGROUP statement. If the NAME clause is omitted the disks
are given a system generated name like "disk_group_1_0001". The FORCE
option can be used to move a disk from another diskgroup into this one.
Creating
diskgroups
SQL> CREATE DISKGROUP dg_asm_data NORMAL REDUNDANCY
FAILGROUP failure_group_1 DISK
'/devices/diska1' NAME diska1, '/devices/diska2' NAME diska2,
FAILGROUP failure_group_2 DISK
'/devices/diskb1' NAME diskb1, '/devices/diskb2' NAME diskb2;
For two-way mirroring we would expect a diskgroup to contain two
failure groups, so individual files are written to two locations.
SQL> CREATE DISKGROUP dg_asm_fra HIGH REDUNDANCY
FAILGROUP failure_group_1 DISK
'/devices/diska1' NAME diska1, '/devices/diska2' NAME diska2,
FAILGROUP failure_group_2 DISK
'/devices/diskb1' NAME diskb1, '/devices/diskb2' NAME diskb2,
FAILGROUP failure_group_3 DISK
'/devices/diskc1' NAME diskc1, '/devices/diskc2' NAME diskc2;
For three-way mirroring we would expect a diskgroup to contain
three failure groups, so individual files are written to three locations.
SQL> CREATE DISKGROUP dg_grp1 EXTERNAL REDUNDANCY
DISK '/dev/d1','/dev/d2','/dev/d3','/dev/d4' ... ...;
In the above command, database will create a diskgroup named
dg_grp1 with the physical disks named /dev/d1, /dev/d2, and so on. Instead of
giving disks separately, we can also specify disk names in wildcards in the
DISK clause as DISK '/dev/d*'.
We have also specified a clause EXTERNAL REDUNDANCY, which
indicates that the failure of a disk will bring down the diskgroup. This is
usually the case when the redundancy is provided by the hardware, such as mirroring.
If there is no hardware based redundancy, the ASM can be set up to create a
special set of disks called failgroup in the diskgroup to provide that
redundancy.
SQL> CREATE DISKGROUP dskgrp1 NORMAL REDUNDANCY
FAILGROUP failgrp1 DISK '/dev/d1','/dev/d2',
FAILGROUP failgrp2 DISK '/dev/d3','/dev/d4';
Although it may appear as such, d3 and d4 are not mirrors of d1
and d2. Rather, ASM uses all the disks to create a fault-tolerant system. For
example, a file on the diskgroup might be created in d1 with a copy maintained
on d4. A second file may be created on d3 with copy on d2, and so on. That is,
primary copy will be on one failure group and secondary copy will be another
(third copy will be another, for high redundancy).
Failure of a specific disk allows a copy on another disk so that
the operation can continue. For example, you could lose the controller for both
disks d1 and d2 and ASM would mirror copies of the extents across the failure
group to maintain data integrity.
SQL> CREATE DISKGROUP dg1 DISK '/dev/raw/*'
ATTRIBUTE 'compatible.rdbms' = '11.1', 'compatible.asm' = '11.1';
(11g R1 command)
SQL> CREATE DISKGROUP dg2 EXTERNAL REDUNDANCY
DISK '/dev/sde1' ATRRIBUTE 'au_size' = '32M'; (11g R1 command)
SQL> CREATE DISKGROUP archdg NORMAL REDUNDANCY
FAILGROUP fg1 DISK
'/devices/diska1','/devices/diska2','/devices/diska3','/devices/diska4'
FAILGROUP fg2 DISK
'/devices/diskb1','/devices/diskb2','/devices/diskb3','/devices/diskb4'
ATTRIBUTE 'au_size'='4M','compatible.asm'='11.2','compatible.rdbms'='11.2','compatible.advm'='11.2'; (11g R2command)
ASMCMD equivalent
for this command is mkdg (11g R2 command).
Listing diskgroups
Listing diskgroups
To find out all the diskgroups:
SQL> SELECT * FROM V$ASM_DISKGROUP;
ASMCMD equivalent
for this command is lsdg.
Dropping
diskgroups
Diskgroups can be deleted using the DROP DISKGROUP statement.
SQL> DROP DISKGROUP disk_group_1 INCLUDING CONTENTS;
SQL> DROP DISKGROUP disk_group_1 FORCE; (11g R1 command)
SQL> DROP DISKGROUP disk_group_1 FORCE INCLUDING CONTENTS; (11gR1 command)
ASMCMD equivalent
for this command is dropdg (11g R2 command).
Altering
diskgroups
Disks can be added or removed from diskgroups using the ALTER
DISKGROUP statement. Remember that the wildcard "*" can be used to
reference disks so long as the resulting string does not match a disk already
used by an existing diskgroup.
Adding disks
We may have to add additional disks into the diskgroup to
accommodate growing demand.
SQL> ALTER DISKGROUP dskgrp1 ADD DISK '/dev/d5';
SQL> ALTER DISKGROUP dg1 ADD DISK '/devices/disk*3',
'/devices/disk*4';
ASMCMD equivalent
for this command is chdg (11g R2 command).
Listing disks
Listing disks
The following command shows all the disks managed by the ASM
instance for all the client databases.
SQL> SELECT * FROM V$ASM_DISK;
ASMCMD equivalent
for this command is lsdsk (11g R1 command).
Listing
client databases
The following command shows all the database instances connected
to the ASM instance.
SQL> SELECT * FROM V$ASM_CLIENT;
ASMCMD equivalent
for this command is lsct.
Dropping disks
We can remove a disk from diskgroup.
SQL> ALTER DISKGROUP dg4 DROP DISK diska4;
ASMCMD equivalent for this command is chdg (11g R2 command).
ASMCMD equivalent for this command is chdg (11g R2 command).
Resizing disks
Disks can be resized using the RESIZE clause of the ALTER
DISKGROUP statement. The statement can be used to resize individual disks, all
disks in a failure group or all disks in the diskgroup. If the SIZE clause is
omitted the disks are resized to the size of the disk returned by the OS.
SQL> ALTER DISKGROUP dg_data_1 RESIZE DISK diska1 SIZE 150G;
Resizing all disks in a failure group
SQL> ALTER DISKGROUP dg_data_1 RESIZE DISKS IN FAILGROUP fg_1
SIZE 50G;
Resizing all disks in a diskgroup
SQL> ALTER DISKGROUP dg_data_1 RESIZE ALL SIZE 100G;
Undropping disks
The UNDROP DISKS clause of the ALTER DISKGROUP statement allows
pending disk drops to be undone. It will not revert drops that have completed,
or disk drops associated with the dropping of a diskgroup.
SQL> ALTER DISKGROUP disk_group_1 UNDROP DISKS;
Online disks
SQL> ALTER DISKGROUP data ONLINE DISK 'disk_0000', 'disk_0001';
SQL> ALTER DISKGROUP data ONLINE DISKS IN FAILGROUP 'fg_99';
SQL> ALTER DISKGROUP data ONLINE ALL;
ASMCMD equivalent for this command is online (11gR2 command).
Offline disks
ASMCMD equivalent for this command is online (11gR2 command).
Offline disks
SQL> ALTER DISKGROUP data OFFLINE DISK 'disk_0000',
'disk_0001';
SQL> ALTER DISKGROUP data OFFLINE DISKS IN FAILGROUP 'fg_99';
SQL> ALTER DISKGROUP data OFFLINE DISK d1_0001 DROP AFTER 30m;
ASMCMD equivalent
for this command is offline (11gR2 command).
Mounting diskgroups
Diskgroups are mounted at ASM instance startup and unmounted at
ASM instance shutdown. Manual mounting and dismounting can be accomplished
using the ALTER DISKGROUP statement as below.
SQL> ALTER DISKGROUP ALL MOUNT;
SQL> ALTER DISKGROUP dg_data2 MOUNT;
SQL> ALTER DISKGROUP dg_data2 MOUNT RESTRICTED; (11gR1 command)
ASMCMD equivalent
for this command is mount (11gR2 command).
Dismounting diskgroups
Dismounting diskgroups
SQL> ALTER DISKGROUP ALL DISMOUNT;
SQL> ALTER DISKGROUP dg_fra DISMOUNT;
ASMCMD equivalent
for this command is umount (11gR2 command).
Changing
attributes
SQL> ALTER DISKGROUP data3 SET ATTRIBUTE 'compatible.rdbms' =
'11.1'; (11gR1 command)
SQL> ALTER DISKGROUP data3 SET ATTRIBUTE 'compatible.asm' =
'11.2';
(11gR1 command)
SQL> ALTER DISKGROUP data3 SET ATTRIBUTE 'disk_repair_time' =
'4.5h'; (11gR1 command)
ASMCMD equivalent for this command is setattr (11gR2 command).
Listing attributes
SQL> SELECT * FROM V$ASM_ATTRIBUTE;
ASMCMD equivalent for this command is lsattr (11gR2 command).
ASMCMD equivalent for this command is setattr (11gR2 command).
Listing attributes
SQL> SELECT * FROM V$ASM_ATTRIBUTE;
ASMCMD equivalent for this command is lsattr (11gR2 command).
Rebalancing
Diskgroups can be rebalanced manually using the REBALANCE clause
of the ALTER DISKGROUP statement. If the POWER clause is omitted the
ASM_POWER_LIMIT parameter value is used. Rebalancing is only needed when the
speed of the automatic rebalancing is not appropriate.
SQL> ALTER DISKGROUP disk_group_1 REBALANCE POWER 6;
ASMCMD equivalent for this command is rebal (11gR2 command).
IO statistics of a diskgroup
SQL> SELECT * FROM V$ASM_DISK_IOSTAT;
ASMCMD equivalent for this command is rebal (11gR2 command).
IO statistics of a diskgroup
SQL> SELECT * FROM V$ASM_DISK_IOSTAT;
ASMCMD equivalent
for this command is iostat (11gR2 command).
Until 11.1.0, all the above commands can not be performed with ASMCMD.
From 11.2.0,
we can.
Directories
As in other file systems, an ASM directory is a container for
files, and an ASM directory can be part of a tree structure of other
directories. The fully qualified filename represents a hierarchy of directories
in which the plus sign (+) represent the root directory. In each diskgroup, ASM
automatically creates a directory hierarchy that corresponds to the structure
of the fully qualified filenames in the diskgroup. The directories in this
hierarchy are known as system-generated directories.
An absolute path refers to the full path of a file or directory.
An absolute path begins with a plus sign (+) followed by a diskgroup name,
followed by subsequent directories in the directory tree. The absolute path
includes directories until the file or directory is reached. A fully qualified
filename is an example of an absolute path to a file. A relative path includes
only the part of the filename or directory name that is not part of the current
directory. That is, the path to the file or directory is relative to the
current directory.
A directory hierarchy can be defined using the ALTER DISKGROUP
statement to support ASM file aliasing.
Creating
a directory
SQL> ALTER DISKGROUP dg_1 ADD DIRECTORY '+dg_1/my_dir';
ASMCMD equivalent
for this command is mkdir.
Renaming
a directory
SQL> ALTER DISKGROUP dg_1 RENAME DIRECTORY '+dg_1/my_dir' TO
'+dg_1/my_dir_2';
Deleting
a directory
SQL> ALTER DISKGROUP dg_1 DROP DIRECTORY '+dg_1/my_dir_2'
FORCE;
ASMCMD equivalent
for this command is rm.
Files
There are several ways to reference ASM files. Some forms are used
during creation and some for referencing ASM files. Every file created in ASM
gets a system-generated filename, known as fully qualified filename, this is
same as complete path name in a local file system.
The forms of the ASM filenames are:
|
Filename Type
|
Format
|
|
Fully
Qualified ASM Filename
|
+dgroup/dbname/file_type/
file_type_tag.file.incarnation
|
|
Numeric
ASM Filename
|
+dgroup.file.incarnation
|
|
Alias
ASM Filenames
|
+dgroup/directory/filename
|
|
Alias
ASM Filename with Template
|
+dgroup(template)/alias
|
|
Incomplete
ASM Filename
|
+dgroup
|
|
Incomplete
ASM Filename with Template
|
+dgroup(template)
|
ASM generates filenames according to the following scheme:
+diskGroupName/databaseName/fileType/fileTypeTag.fileNumber.incarnation
e.g: +dgroup2/crm/CONTROLFILE/Current.256.541956473
+dg_fra/hrms/DATAFILE/users.309.621906475
ASM does not place system-generated files into user-created
directories; it places them only in system-generated directories. We can add
aliases or other directories to a user-created directory.
Dropping Files
Files are not deleted automatically if they are created using aliases, as they are not Oracle Managed Files (OMF), or if a recovery is done to a point-in-time before the file was created. For these circumstances it is necessary to manually delete the files, as shown below.
Files are not deleted automatically if they are created using aliases, as they are not Oracle Managed Files (OMF), or if a recovery is done to a point-in-time before the file was created. For these circumstances it is necessary to manually delete the files, as shown below.
Dropping file using an alias
SQL> ALTER DISKGROUP dg_2 DROP FILE '+dg_2/my_dir/my_file.dbf';
Dropping file using a numeric form filename
SQL> ALTER DISKGROUP dg_2 DROP FILE '+dg_2.321.123456789';
Dropping file using a fully qualified filename
SQL> ALTER DISKGROUP dg_2 DROP FILE
'+dg_2/mydb/datafile/my_ts.292.265390671';
ASMCMD equivalent
for this command is rm.
Aliases
Aliases allow you to reference ASM files using user-friendly
names, rather than the fully qualified ASM filenames.
Creating an alias
Creating an alias, using the fully qualified filename
SQL> ALTER DISKGROUP dg_3 ADD ALIAS '+dg_3/my_dir/users.dbf'
FOR '+dg_3/mydb/datafile/users.392.333222555';
Creating an alias, using the numeric form filename
SQL> ALTER DISKGROUP dg_3 ADD ALIAS '+dg_3/my_dir/my_file.dbf'
FOR '+dg_3.317.111222333';
ASMCMD equivalent
for this command is mkalias.
Renaming an alias
SQL> ALTER DISKGROUP dg_3 RENAME ALIAS
'+dg_3/my_dir/my_file.dbf' TO '+dg_3/my_dir/my_file2.dbf';
Deleting an alias
SQL> ALTER DISKGROUP dg_3 DELETE ALIAS
'+dg_3/my_dir/my_file.dbf';
ASMCMD equivalent
for this command is rmalias.
Attempting to drop a system alias results in an error.
Templates
Templates are named groups of attributes that can be applied to
the files within a diskgroup. The level of redundancy and the granularity of
the striping can be controlled using templates. Default templates are provided
for each file type stored by ASM, but additional templates can be defined as
needed.
Available attributes are:
·
UNPROTECTED - No mirroring or striping regardless of the
redundancy setting.
·
MIRROR - Two-way mirroring for normal redundancy and three-way
mirroring for high redundancy.
·
COARSE - Specifies lower granularity for striping.
·
FINE - Specifies higher granularity for striping.
MIRROR, COARSE, FINE attributes are cannot be set for external
redundancy.
Creating a template
SQL> ALTER DISKGROUP dg_4 ADD TEMPLATE mf_template ATTRIBUTES
(MIRROR FINE);
ASMCMD equivalent
for this command is mktmpl (11gR2 command).
Modifying
a template
SQL> ALTER DISKGROUP dg_4 ALTER TEMPLATE c_template ATTRIBUTES
(COARSE);
ASMCMD equivalent
for this command is chtmpl (11gR2 command).
Listing templates
SQL> SELECT * FROM V$ASM_TEMPLATE;
ASMCMD equivalent for this command is lstmpl (11gR2 command).
Listing templates
SQL> SELECT * FROM V$ASM_TEMPLATE;
ASMCMD equivalent for this command is lstmpl (11gR2 command).
Dropping
a template
SQL> ALTER DISKGROUP dg_4 DROP TEMPLATE u_template;
ASMCMD equivalent
for this command is rmtmpl (11gR2 command).
Checking Metadata
The internal consistency of diskgroup metadata can be checked in a
number of ways using the CHECK clause of the ALTER DISKGROUP statement.
Checking metadata for a specific file
SQL> ALTER DISKGROUP dg_5 CHECK FILE '+dg_5/my_dir/my_file.dbf'
Checking metadata for a specific disk in the diskgroup
SQL> ALTER DISKGROUP dg_5 CHECK DISK diska1;
Checking metadata for a specific failure group in the diskgroup
SQL> ALTER DISKGROUP dg_5 CHECK FAILGROUP failure_group_1;
Checking metadata for all disks in the diskgroup
SQL> ALTER DISKGROUP dg_5 CHECK ALL;
SQL> ALTER DISKGROUP dg_5 CHECK;
SQL> ALTER DISKGROUP dg_5 CHECK NOREPAIR;
SQL> ALTER DISKGROUP dg_5 CHECK REPAIR;
ASMCMD equivalent
for this command is chkdg (11gR2 command).
User Management
From Oracle 11g release 2, we can create ASM users and usergroups and manipulate the permissions and ownership of files.
Creating an ASM usergroup
SQL> ALTER DISKGROUP data_dg ADD USERGROUP 'grp1';
SQL> ALTER DISKGROUP data_dg ADD USERGROUP 'grp2' WITH MEMBER 'oracle1','oracle2';
ASMCMD equivalent for this command is mkgrp (11gR2 command).
Listing ASM usergroups
To find out the list of ASM usergroups.
SQL> SELECT * FROM V$ASM_USERGROUP;
ASMCMD equivalent for this command is lsgrp (11gR2 command).
Dropping an ASM usergroup
SQL> ALTER DISKGROUP data_dg DROP USERGROUP 'grp1';
ASMCMD equivalent for this command is rmgrp (11gR2 command).
Modifying(adding/deleting ASM users to/from) an ASM usergroup
SQL> ALTER DISKGROUP data_dg MODIFY USERGROUP 'grp2' ADD MEMBER 'oracle3';
SQL> ALTER DISKGROUP data_dg MODIFY USERGROUP 'grp2' DROP MEMBER 'oracle3';
ASMCMD equivalent for this command is grpmod (11gR2 command).
Creating an ASM user
SQL> ALTER DISKGROUP data_dg ADD USER 'oracle1';
ASMCMD equivalent for this command is mkusr (11gR2 command).
Listing ASM users
To find out the list of ASM users.
SQL> SELECT * FROM V$ASM_USER;
ASMCMD equivalent for this command is lsusr (11gR2 command).
Listing ASM usergroups to which user belongs
SQL> SELECT * FROM V$ASM_USERGROUP_MEMBER;
ASMCMD equivalent for this command is groups (11gR2 command).
Dropping an ASM user
SQL> ALTER DISKGROUP data_dg DROP USER 'oracle1';
ASMCMD equivalent for this command is rmusr (11gR2 command).
Modifying permissions for a file
SQL> ALTER DISKGROUP data_dg SET PERMISSION OWNER=read write, GROUP=read only, OTHER=none FOR FILE '+data_dg/controlfile.f';
ASMCMD equivalent for this command is chmod (11gR2 command).
Modifying ownership of a file
SQL> ALTER DISKGROUP data_dg SET OWNERSHIP OWNER='oracle1', GROUP='grp1' FOR FILE '+data_dg/controlfile.f';
ASMCMD equivalent for this command is chown (11gR2 command).
Volume Management
From 11g release 2, we can create Oracle ASM Dynamic Volume Manager (Oracle ADVM) volumes in a diskgroups. The volume device associated with the dynamic volume can then be used to host an (Oracle ACFS) file system.
Creating a volume
SQL> ALTER DISKGROUP data_dg ADD VOLUME volume1 SIZE 20G;
ASMCMD equivalent for this command is volcreate (11gR2 command).
Listing volume information
To find out the volumes information.
SQL> SELECT * FROM V$ASM_VOLUME;
ASMCMD equivalent for this command is volinfo (11gR2 command).
Listing volume statistics
To find out the volumes statistics information.
SQL> SELECT * FROM V$ASM_VOLUME_STAT;
ASMCMD equivalent for this command is volstat (11gR2 command).
Dropping a volume
SQL> ALTER DISKGROUP data_dg DROP VOLUME volume1;
ASMCMD equivalent for this command is voldelete (11gR2 command).
Resizing a volume
SQL> ALTER DISKGROUP fra_dg RESIZE VOLUME volume1 SIZE 25G;
ASMCMD equivalent for this command is volresize (11gR2 command).
Disabling a volume
SQL> ALTER DISKGROUP redo_dg DISABLE VOLUME volume1;
SQL> ALTER DISKGROUP ALL DISABLE VOLUME ALL;
ASMCMD equivalent for this command is voldisable (11gR2 command).
Enabling a volume
SQL> ALTER DISKGROUP arch_dg ENABLE VOLUME volume1;
ASMCMD equivalent for this command is volenable (11gR2 command).
Setting a volume
SQL> ALTER DISKGROUP asm_dg_data MODIFY VOLUME volume1 USAGE 'acfs';
ASMCMD equivalent for this command is volset (11gR2 command).
Misc
Listing the current operations
SQL> SELECT * FROM V$ASM_OPERATION;
ASMCMD equivalent for this command is lsop (11gR2 command).
Creating Tablespaces
Now create a tablespace in the main database using a datafile in
the ASM-enabled storage.
SQL> CREATE TABLESPACE user_data DATAFILE
'+dskgrp1/user_data_01'
SIZE 1024M;
ASM filenames can be used in place of conventional filenames for
most Oracle file types, including controlfiles, datafiles, logfiles etc. For
example, the following command creates a new tablespace with a datafile in the
disk_group_1 diskgroup.
SQL> CREATE TABLESPACE my_ts DATAFILE '+disk_group_1' SIZE 100M
AUTOEXTEND ON;
Note how the diskgroup is used as a virtual file system. This
approach is useful not only in datafiles, but in other types of Oracle files as
well. For instance, we can create online redo log files as
...
LOGFILE GROUP 1 (
'+dskgrp1/redo/group_1.258.659723485',
'+dskgrp2/redo/group_1.258.659723485'
) SIZE 50M,
...
Archived log destinations can also be set to a diskgroup.
Everything related to Oracle database can be created in an ASM diskgroup.
Backup is another great use of ASM. You can set up a bunch of inexpensive disks
to create the recovery area of
a database, which can be used by RMAN to
create backup datafiles and archived log files.
ASM supports files created by and read by the Oracle database
only; it is not a replacement for a general-purpose file system.
Until Oracle 11g
release1, we cannot store binaries or flat files. We cannot use ASM
for storing the voting disk and OCR. It is due to the fact that Clusterware
starts before ASM instance and it should be able to access these files which
are not possible if you are storing it on ASM. You will have to use raw devices
or OCFS or any other shared storage. But from 11g release 2,
we can store ALL files on ASM.
Can we see the files stored in the ASM instance using standard
Unix commands?
No, you cannot see the files using standard Unix commands like ls.
You need to use utility called asmcmd to do this.Oracle 10g
release2 introduces asmcmd which
makes administration very easy.
$ asmcmd
ASMCMD>
ASMLIB is the support library for the ASM. ASMLIB allows an Oracle
database using ASM more efficient and capable access to diskgroups. The purpose
of ASMLIB, is to provide an alternative interface to identify and access block
devices. ASMLIB API enables storage and OS vendors to supply extended
storage-related features.
Migrating to ASM using RMAN
The following method shows how a database can be migrated to ASM
from a disk based backup:
1) Shutdown the database.
SQL> SHUTDOWN IMMEDIATE
2) Modify the parameter file of the database as follows:
Set DB_CREATE_FILE_DEST and DB_CREATE_ONLINE_LOG_DEST_n parameters
to the relevant ASM diskgroups.
3) Remove CONTROL_FILES parameter from the spfile so the control
files will be moved to the DB_CREATE_* destination and the spfile gets updated
automatically. If you are using a pfile the CONTROL_FILES parameter must be set
to the appropriate ASM files or aliases.
4) Start the database in nomount mode.
RMAN> STARTUP NOMOUNT
5) Restore the controlfile into the new location from the old
location.
RMAN> RESTORE CONTROLFILE FROM 'old_control_file_name';
6) Mount the database.
RMAN> ALTER DATABASE MOUNT;
7) Copy the database into the ASM diskgroup.
RMAN> BACKUP AS COPY DATABASE FORMAT '+disk_group';
8) Switch all datafile to the new ASM location.
RMAN> SWITCH DATABASE TO COPY;
9) Open the database.
RMAN> ALTER DATABASE OPEN;
10) Create new redo logs in ASM and delete the old ones.
ASM New features in Oracle 11g
release1
·
Support for rolling upgrades.
·
We can maintain version compatibilites at diskgroup level.
SQL> alter diskgroup dg-name set attribute 'compatible.rdbms'='11.1';
SQL> alter diskgroup dg-name set attribute 'compatible.asm'='11.1';
SQL> alter diskgroup dg-name set attribute 'compatible.rdbms'='11.1';
SQL> alter diskgroup dg-name set attribute 'compatible.asm'='11.1';
·
ASM drops disks and if they remain offline for more than 3.6
hours. The diskgroups default time limit is altered by changing the
DISK_REPAIR_TIME parameter with a unit of minutes(M/m) or hours(H/h).
SQL> alter diskgroup dg-name set attribute 'disk_repair_time'='4.5h';
SQL> alter diskgroup dg-name set attribute 'disk_repair_time'='4.5h';
·
Automatic bad block detection and repair.
·
Supports variable extent(allocation unit) sizes. The total number
of extents in shared pool will be significantly reduced and improved
performance.
SQL> create diskgroup ... attribute 'au_size' = 'number-of-bytes';
SQL> create diskgroup ... attribute 'au_size' = 'number-of-bytes';
·
New SYSASM role (like SYSDBA, SYSOPER) & OSASM OS group (like
OSDBA, OSOPER) to manage ASM instance only. This will separate storage
administration from database administration.
$ sqlplus "/as sysasm" or $ asmcmd -a sysasm
$ sqlplus "/as sysasm" or $ asmcmd -a sysasm
·
ASM Preferred Mirror Read or Preferred Read Failure Groups -
ASM_PREFERRED_READ_FAILURE_GROUPS parameter is set to the preferred failure
groups for each node.
·
Faster Mirror Resync - Fast mirror resync after temporary
connectivity lost.
·
We can drop a diskgroup forcefully.
SQL> drop diskgroup dg-name force including contents;
SQL> drop diskgroup dg-name force including contents;
·
Can mount the disk in restricted mode, to rebalance faster.
SQL> alter diskgroup dg-name mount restricted;
SQL> alter diskgroup dg-name mount restricted;
·
New commands in ASMCMD.
o
cp -
to copy between ASM and local or remote destination.
o
md_backup -
to backup metadata.
o
md_restore -
to restore metadata.
o
lsdsk -
to list(check) disks.
o
remap -
to repair a range of physical blocks on disk.
ASM New features in Oracle 11g
release2
·
ASM Configuration Assistant (ASMCA) is a new tool to install and
configure ASM.
·
ASM Cluster File System (ACFS) provides support for files such as
Oracle binaries, Clusterware binaries, report files, trace files, alert logs,
external files, and other application datafiles. ACFS can be managed by
ACFSUTIL, ASMCMD,
OEM, ASMCA, SQL command interface.
·
ASM Dynamic Volume Manager (ADVM) provides volume management
services and a standard device driver interface to its clients (ACFS, ext3,
OCFS2 and third party files systems).
·
ACFS Snapshots are read-only on-line, space efficient, point in
time copy of an ACFS file system. ACFS snapshots can be used to recover from
inadvertent modification or deletion of files from a file system.
·
ASM can hold and manage OCR (Oracle Cluster Registry) file and
voting file.
·
ASM diskgroups can be renamed, by using renamedg command.
·
ASMCMD utility can do
o
startup and
shutdown of ASM instances.
o
Managing diskgroups (create, mount, alter, drop).
o
File access control (like OS, ugo and rwx ...).
o
User management.
o
Template management.
o
Volume management.
o
We can execute OS commands at asmcmd by using !, in the same
we do at SQL prompt.
ASM New features in Oracle Clusterware 12c
1. Oracle Flex ASM - This feature of Oracle Clusterware 12c claims to reduce per-node overhead of using ASM instance. Now the instances can use remote node ASM for any planned/unplanned downtime. ASM metadata requests can be converted by non-local instance of ASM.
2. ASM Disk Scrubbing - From RAC 12c, ASM comes with disk scrubbing feature so that logical corruptions can be discovered. Also Oracle 12c ASM can automatically correct this in normal or high redundancy diskgroups.
3. Oracle ASM Disk Resync & Rebalance enhancements.
ASM Views
The ASM configuration can be viewed using the V$ASM_% views, which
contain information depending on whether they are queried from the ASM
instance, or a dependant database instance.
|
View
|
In ASM instance
|
In DB instance
|
|
V$ASM_ALIAS
|
Displays
a row for each alias present in every diskgroup mounted by the ASM instance.
|
Returns
no rows.
|
|
V$ASM_ATTRIBUTE
(11gR2)
|
Displays
attributes of diskgroups.
|
Displays
attributes of diskgroups.
|
|
V$ASM_CLIENT
|
Displays
a row for each database instance using a diskgroup managed by the ASM
instance.
|
Displays
a row for the ASM instance if the database has open ASM files.
|
|
V$ASM_DISK
or V$ASM_DISK_STAT
|
Displays
a row for each disk discovered by the ASM instance, including disks which are
not part of any diskgroup.
|
Displays
a row for each disk in diskgroups in use by the database instance.
|
|
V$ASM_DISK_IOSTAT(11gR2)
|
Displays
IO statistics of
disks.
|
Displays
IO statistics of disks.
|
|
V$ASM_DISKGROUP
or V$ASM_DISKGROUP_STAT
|
Displays
a row for each diskgroup discovered by the ASM instance.
|
Displays
a row for each diskgroup mounted by the local ASM instance.
|
|
V$ASM_FILE
|
Displays
a row for each file for each diskgroup mounted by the ASM instance.
|
Displays
no rows.
|
|
V$ASM_FILESYSTEM (11gR2)
|
Displays
a row for each filesystem for each diskgroup mounted by the ASM instance.
|
Displays
no rows.
|
|
V$ASM_OPERATION
|
Displays
a row for each file for each long running operation executing in the ASM
instance.
|
Displays
no rows.
|
|
V$ASM_TEMPLATE
|
Displays
a row for each template present in each diskgroup mounted by the ASM
instance.
|
Displays
a row for each template present in each diskgroup mounted by the ASM
instance.
|
|
V$ASM_USER (11gR2)
|
Displays
a row for each ASM user.
|
-
|
|
V$ASM_USERGROUP (11gR2)
|
Displays
a row for each ASM usergroup.
|
-
|
|
V$ASM_USERGROUP_MEMBER(11gR2)
|
Displays
ASM usergroups and it's members.
|
-
|
|
V$ASM_VOLUME
orV$ASM_VOLUME_STAT(11gR2)
|
Displays
a row for each volume.
|
-
|
ASM backup can be taken by spooling the output of the ASM views to text file.
SPOOL asm_views.log
SET ECHO ON
SELECT * FROM V$ASM_ALIAS;
SELECT * FROM V$ASM_ATTRIBUTE;
SELECT * FROM V$ASM_ATTRIBUTE;
SELECT * FROM V$ASM_CLIENT;
SELECT * FROM V$ASM_DISK;
SELECT * FROM V$ASM_DISK_IOSTAT;SELECT * FROM
V$ASM_DISK_STAT;
SELECT * FROM V$ASM_DISKGROUP;
SELECT * FROM V$ASM_DISKGROUP_STAT;
SELECT * FROM V$ASM_FILE;
SELECT * FROM V$ASM_FILESYSTEM;
SELECT * FROM V$ASM_FILESYSTEM;
SELECT * FROM V$ASM_OPERATION;
SELECT * FROM V$ASM_TEMPLATE;
SELECT * FROM V$ASM_USER;
SELECT * FROM V$ASM_USERGROUP;
SELECT * FROM V$ASM_USERGROUP_MEMBER;
SELECT * FROM V$ASM_VOLUME;
SELECT * FROM V$ASM_VOLUME_STAT;
SELECT * FROM V$ASM_USERGROUP;
SELECT * FROM V$ASM_USERGROUP_MEMBER;
SELECT * FROM V$ASM_VOLUME;
SELECT * FROM V$ASM_VOLUME_STAT;
SPOOL OFF
Subscribe to:
Posts
(
Atom
)